

Redtail Integration Guide
SmartAsset OAT works directly with Redtail CRM to add new leads automatically. Each SmartAsset lead becomes a Redtail contact, with the status, source, category, advisor assignments, tags, and keywords you choose — plus the SmartAsset survey information saved as a note. Follow the instructions below to connect Redtail.
Before you begin
Section titled “Before you begin”- Have your Redtail credentials ready.
- If you don’t see CRM under Settings > Company, CRM isn’t turned on for your company. Email amphelp@smartasset.com for help.
Step 1: Connect Redtail
Section titled “Step 1: Connect Redtail”- To open this page, go to Settings > CRM.
- Click Connect to CRM. The CRM Configuration window opens on the Redtail tab.
- In Username, enter your Redtail username.
- In Password, enter your Redtail password.
- Click Save changes.
Once the connection succeeds:
- Redtail and your Redtail username appear on the CRM page.
- The CRM switch turns on, so new leads go to Redtail automatically.
- A Configure Redtail button appears next to Connect to CRM.
Step 2: Configure Your Redtail Settings
Section titled “Step 2: Configure Your Redtail Settings”-
On the CRM page, click Configure Redtail. The Company Redtail Configuration page opens on the Default tab.
-
Set the options described below.
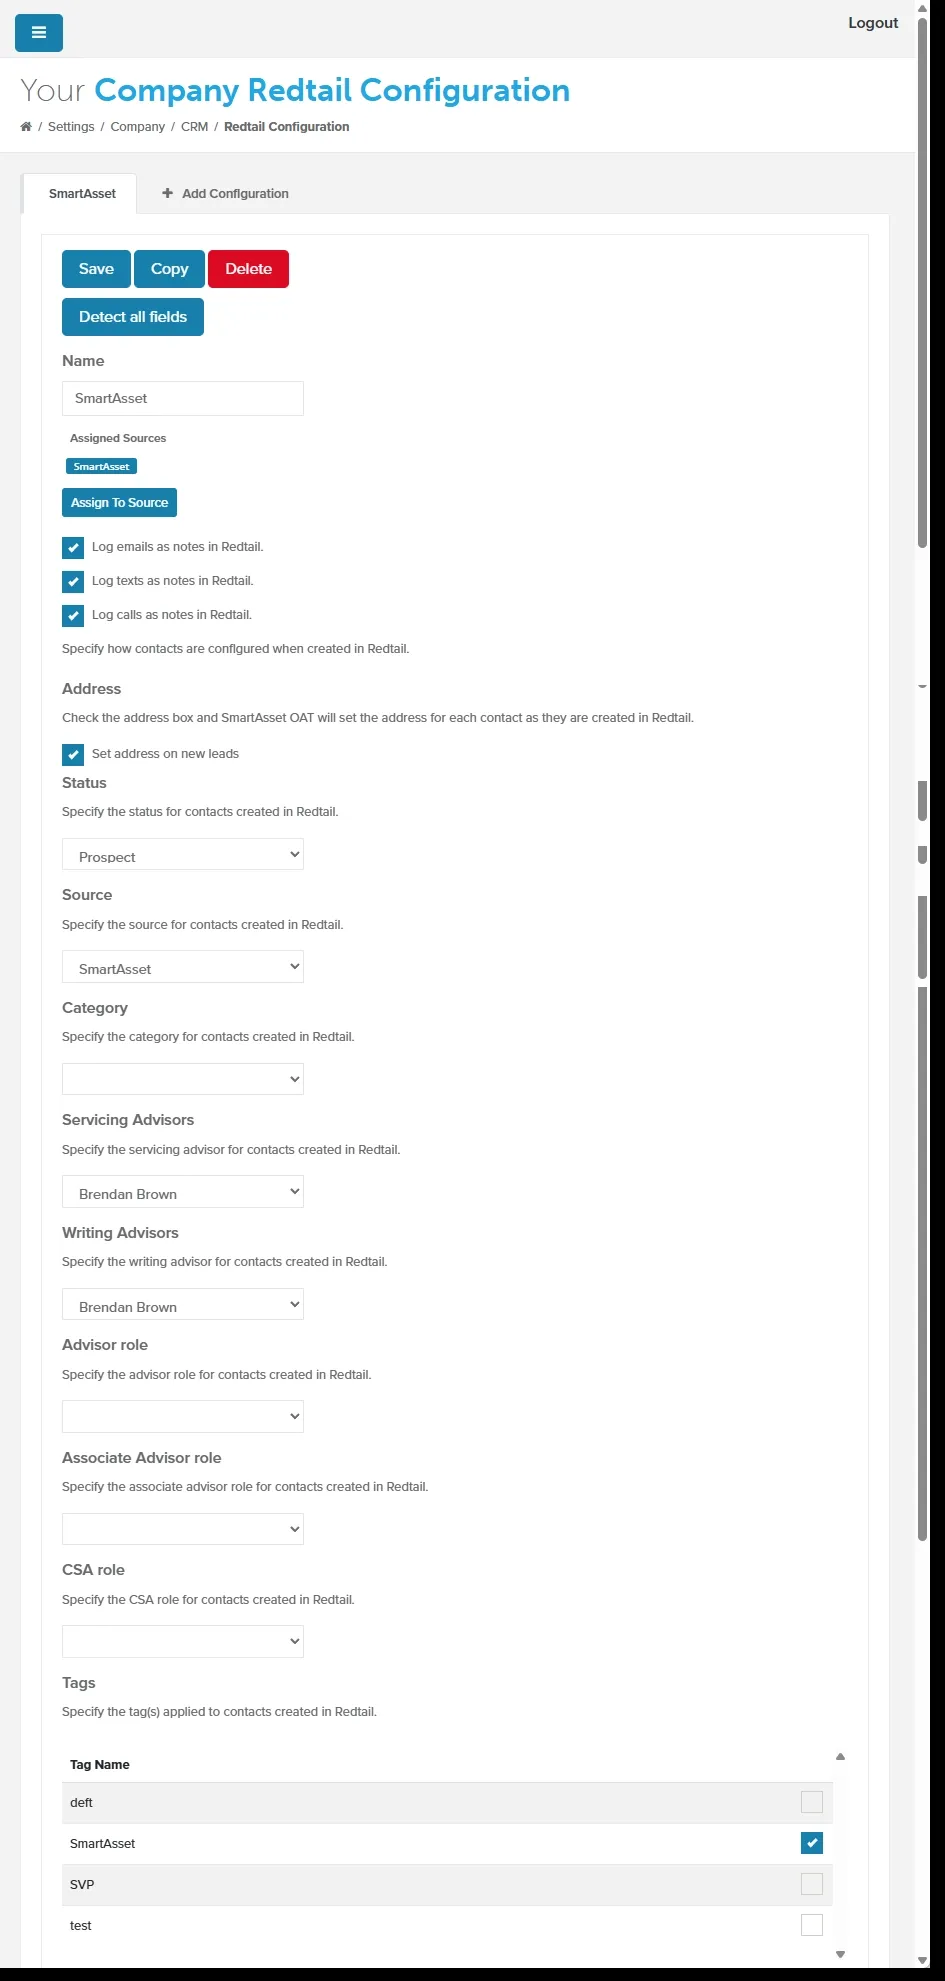
-
Click Save. A confirmation message appears.
Detect all fields
Section titled “Detect all fields”Click Detect all fields to pull the current lists of statuses, sources, categories, advisors, tags, keywords, workflow templates, and activity templates from your Redtail account. The page does this for you when it loads; click the button any time you add something new in Redtail and want it to appear in the dropdowns right away.
Name and assignment
Section titled “Name and assignment”- Name — what this configuration is called. Use something you’ll recognize on the Lead Sources page.
- Assign To Source — opens the Lead Sources page so you can attach this configuration to a source. Sources and lead types already using it are listed under Assigned Sources.
Activity logging
Section titled “Activity logging”Three checkboxes control what OAT writes back to the Redtail contact as notes. They’re off until you check them:
- Log emails as notes in Redtail.
- Log texts as notes in Redtail.
- Log calls as notes in Redtail.
Contact details
Section titled “Contact details”- Address — check Set address on new leads and OAT will add the lead’s city, state, and ZIP to the Redtail contact.
- Status — the status applied to contacts created in Redtail.
- Source — the source applied to contacts created in Redtail.
- Category — the category applied to contacts created in Redtail.
Advisors and roles
Section titled “Advisors and roles”| Setting | What it sets on the new contact |
|---|---|
| Servicing Advisors | The servicing advisor |
| Writing Advisors | The writing advisor |
| Advisor role | The user assigned to the Advisor role |
| Associate Advisor role | The user assigned to the Associate Advisor role |
| CSA role | The user assigned to the CSA role |
Tags and keywords
Section titled “Tags and keywords”- Tags — check the tag(s) to apply to contacts created in Redtail.
- Keywords — check the keyword(s) to apply to contacts created in Redtail.
Workflow templates
Section titled “Workflow templates”Check the Redtail workflow(s) to start on contacts created in Redtail. For workflows set to exclude weekends, you can also set the target date to fall a number of business days after the contact is created.
Activity templates
Section titled “Activity templates”Check the Redtail activity template(s) to apply to contacts created in Redtail. Each one can be delayed a number of business days so the activity doesn’t land the moment the lead arrives.
Save, Copy, and Delete
Section titled “Save, Copy, and Delete”- Save — saves the configuration.
- Copy — duplicates it as a starting point for a second configuration, named “Copy of” plus the original name.
- Delete — removes it. A configuration can’t be deleted while a lead source or lead type is still using it, and your last remaining configuration can’t be deleted.
Step 3: Assign Your Redtail Configuration to a Lead Source
Section titled “Step 3: Assign Your Redtail Configuration to a Lead Source”- In the side nav, click Lead Sources.
- In the CRM Configuration column, select your Redtail configuration for the Default row. To use a different one for a lead type, select it in that lead type’s row.
- Click Save and the source name, for example Save SmartAsset Settings.
The source now appears under Assigned Sources on the Redtail configuration page.
Using More Than One Configuration
Section titled “Using More Than One Configuration”If you treat leads differently by source or lead type, you can build more than one Redtail configuration. For example, one can tag leads from a particular source and start a specific workflow, while another doesn’t.
- On the Company Redtail Configuration page, click Add Configuration. A new tab opens, named Redtail Configuration # and a number.
- In Name, enter a name you’ll recognize on the Lead Sources page.
- Set the options.
- Click Save.
To use it, assign it to a lead source as in Step 3.
Automatic vs. Manual Sync
Section titled “Automatic vs. Manual Sync”The CRM switch controls whether new leads go to Redtail on their own. You’ll find it on Settings > Company (Push to CRM) and on Settings > CRM. When it’s off, select leads on the Leads page and click Bulk Edit > Push to CRM.
For step-by-step instructions, see CRM Integration.
Related Guides
Section titled “Related Guides”- CRM Integration: overview of CRM integration and the other supported CRMs
- Lead Sources: Routing & Automation: where CRM configurations get assigned