

Leads Screen
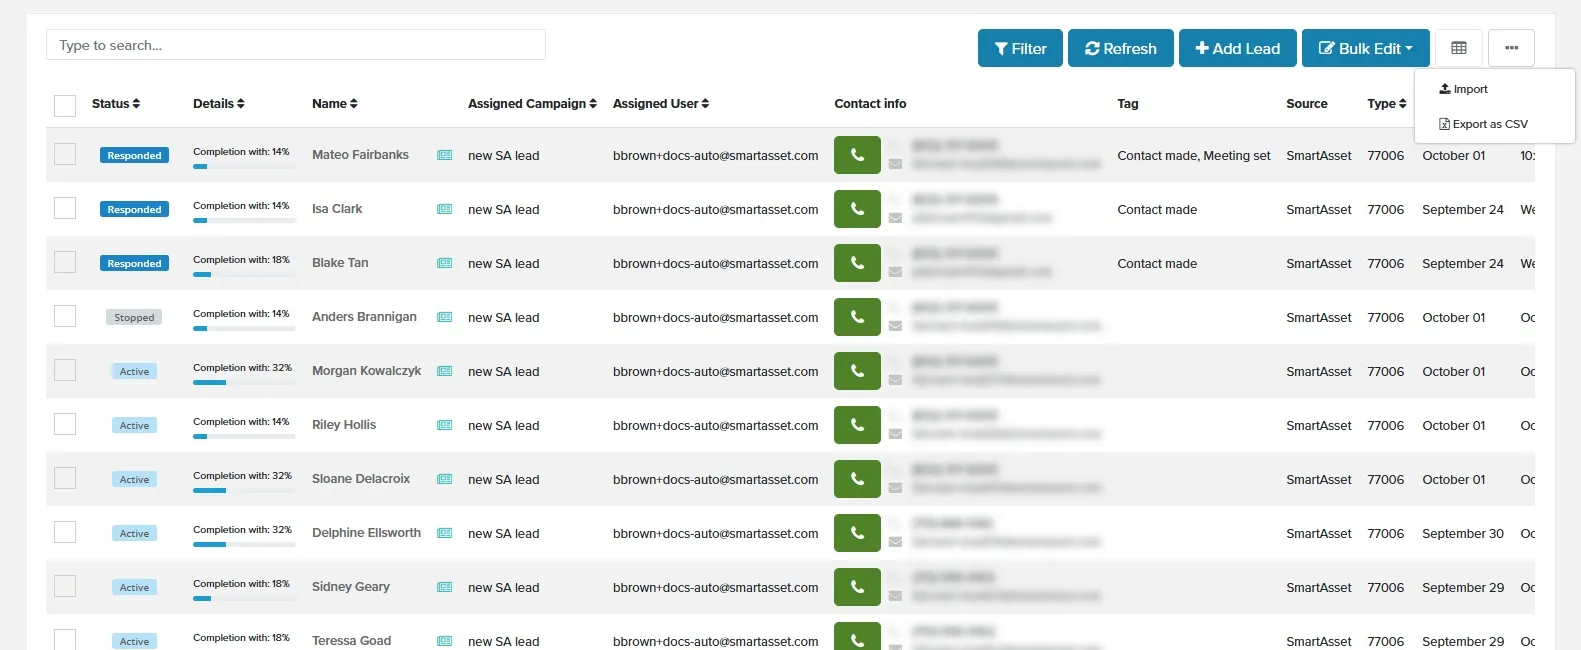
The Leads page lists your leads and shows each lead’s status. From here you can search, filter, tag, export and import leads, and open any lead to see its details.
Understanding Lead Status
Section titled “Understanding Lead Status”Each lead has a status that shows where it is in your outreach:
- No Campaign: The lead has no campaign assigned, or came in through Live Connection.
- Active: The lead’s campaign has steps left to send.
- New SMS: The lead sent a text you haven’t read. This status shows ahead of any other until you read the text.
- Responded: The lead replied by email, text or call, or booked a meeting, or someone clicked Mark Responded or Log Meeting on the lead’s Timeline. Their campaign stops.
- Stopped: Someone stopped the campaign with Stop Campaign, from the lead’s Actions menu or from Bulk Edit. A lead also shows Stopped when the assigned user’s email disconnects; hover the status to see Disconnected Email.
- Finished: The campaign sent every step without a response.
- Unsubscribed: The lead used the unsubscribe link in an email, or someone chose Actions > Unsubscribe. Their campaign stops, and resuming it can’t send emails or texts.
- Opted out: The lead opted out by text. OAT won’t text or call them.
The Leads Page Toolbar
Section titled “The Leads Page Toolbar”- The Type to search… box: searches your leads as you type.
- Filter: opens the Filters panel.
- Refresh: reloads the list.
- Add Lead: adds a single lead.
- Bulk Edit: acts on the leads you select with the checkboxes: Add Tags, Assign Campaign, Stop Campaign, Resume Campaign, Push to CRM (when a CRM is connected) and Delete Lead. Assign Newsletter and Unassign Newsletter also appear when newsletters are on.
- The table icon: chooses which columns the list shows.
- The ⋯ button: holds Import and Export as CSV.
Managing Your Leads
Section titled “Managing Your Leads”Using Tags
Section titled “Using Tags”Tags label leads so you can find and filter them later. To tag one lead, open it and type in the Search or create tag… box. To tag several leads at once, select them and click Bulk Edit > Add Tags.
Using Filtered Lists
Section titled “Using Filtered Lists”A filtered list saves a set of filters, such as status, tags or source, so you can reopen it later. Your saved lists are under Filtered Lead Lists > View All in the side menu.
Exporting Leads
Section titled “Exporting Leads”- In the side menu, click Leads, or open a list under Filtered Lead Lists.
- In the toolbar, click the ⋯ button.
- Click Export as CSV. The Export window opens.
- Click Export All Leads, or click Export New Leads to export only leads added since the last export. On a filtered list, the window has a single Export button.
The CSV file downloads to your computer. It includes each lead’s contact details, status, campaign, assigned user, tags and notes.
Importing Leads
Section titled “Importing Leads”To add leads from a CSV file, click the ⋯ button in the toolbar and choose Import. You can set a campaign, lead type, tags and assigned user for the whole file, and optionally insert the leads into your CRM. Leads already in OAT are skipped, not updated.
Opening a Lead
Section titled “Opening a Lead”To see a lead’s contact details, timeline and texts, click the lead’s name or Details.
Related Guides
Section titled “Related Guides”- Lead Details Screen: a lead’s details, timeline, texts and campaign actions
- Filtering your Leads: build, save and manage filtered lists
- Tagging Leads: create tags and add them to one lead or many
- How to Import Leads: the full CSV import procedure and template rules