

Getting Started with Newsletters
Overview
Section titled “Overview”Newsletters help you stay in touch with your leads and clients automatically. We generate newsletter drafts based on your preferences. You just review and approve them before they go out.
What you’ll learn in this guide:
- How to set up your newsletter preferences
- How to review and approve newsletters
- How to manage who receives your newsletters
- How to see how your newsletters are performing
Before You Start
Section titled “Before You Start”Why schedule a demo?
Section titled “Why schedule a demo?”Newsletters is a new feature that requires a one-time setup step. During this short call, we’ll make sure your account is ready so newsletter drafts can start generating correctly.
Step 1: Set Your Newsletter Preferences
Section titled “Step 1: Set Your Newsletter Preferences”Your preferences tell us what kind of newsletters to create for you.
- To get started, click Newsletters in the left menu
- Fill out each section of the preferences form
First time here?
Section titled “First time here?”The newsletter preferences wizard will start automatically. You can update your preferences anytime by going to Newsletters → Newsletter Preferences.
Getting Started: Newsletter Preferences Wizard
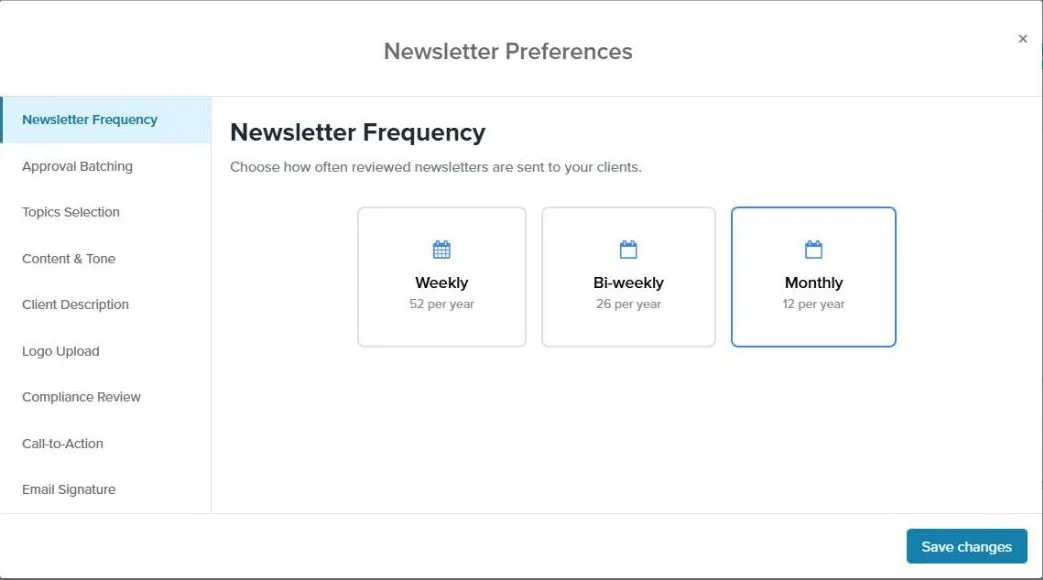
Choose How Often to Send
Section titled “Choose How Often to Send”Choose how frequently you want to send newsletters to your subscribers:
| Frequency | How Many Per Year |
|---|---|
| Weekly | 52 |
| Bi-weekly (every 2 weeks) | 26 |
| Monthly | 12 |
Choose How Drafts Are Batched for Review
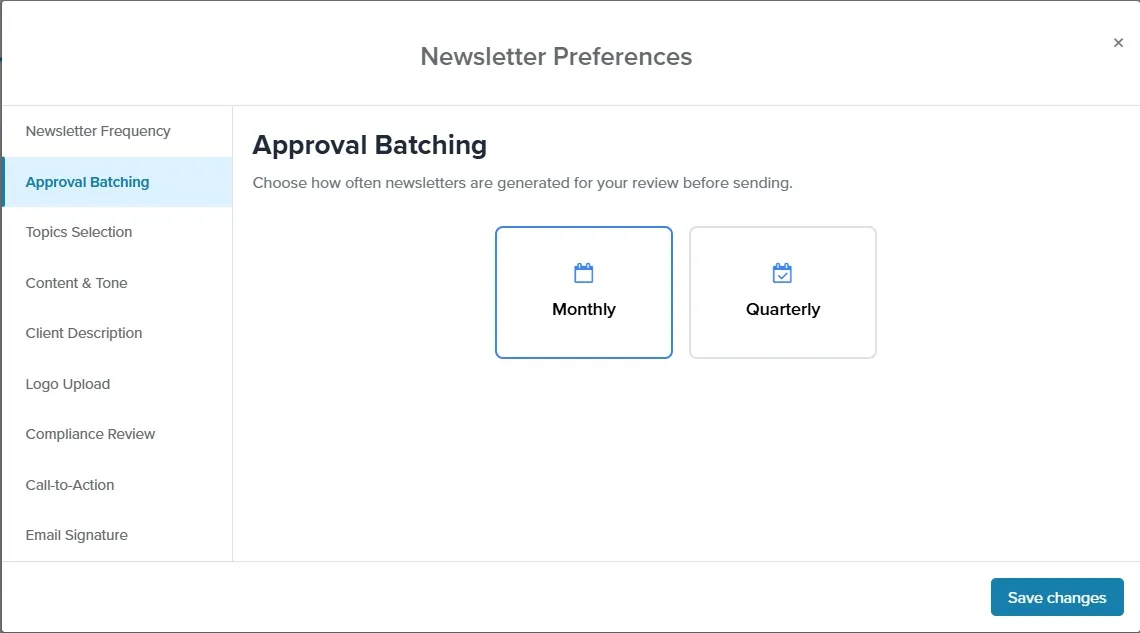
Section titled “Choose How Drafts Are Batched for Review”This setting isn’t part of the setup wizard. After setup, go to Newsletters → Newsletter Preferences → Approval Batching to choose how many months of drafts are created for your review at once:
- Monthly (default): drafts arrive one month at a time.
- Quarterly: drafts for a whole quarter arrive together.
Either way, drafts are ready for review about a month before they send, and you’ll get a “Your newsletters for … are ready” email when a batch is ready (if newsletter email notifications are on). Batching doesn’t change how approval works: you still approve each newsletter, or send it for compliance review, one at a time.
Choose Your Topics
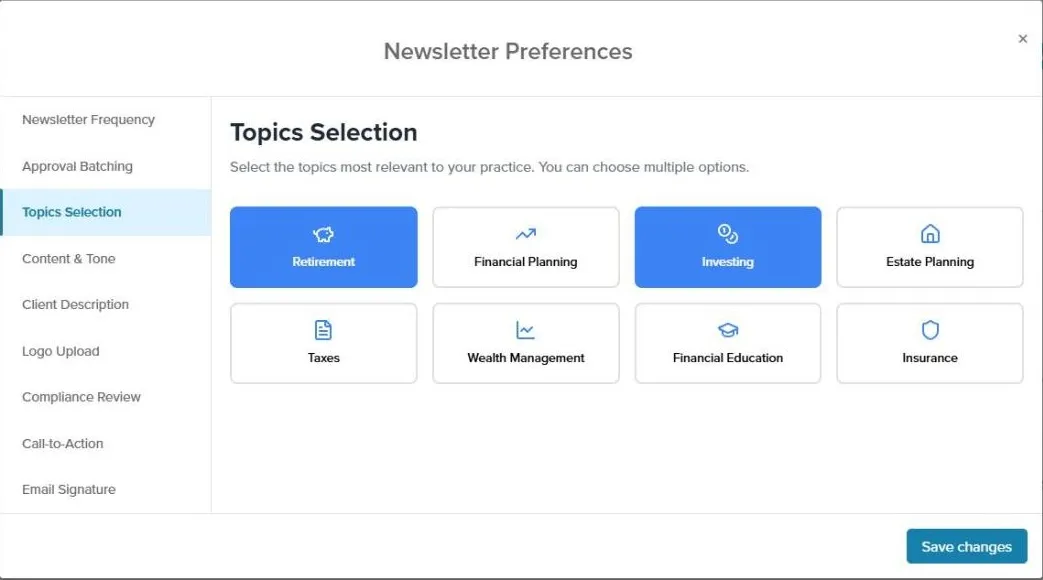
Section titled “Choose Your Topics”Select the topic areas you want your newsletters to cover. Pick topics that match what your typical clients care about.
Choose Your Writing Style
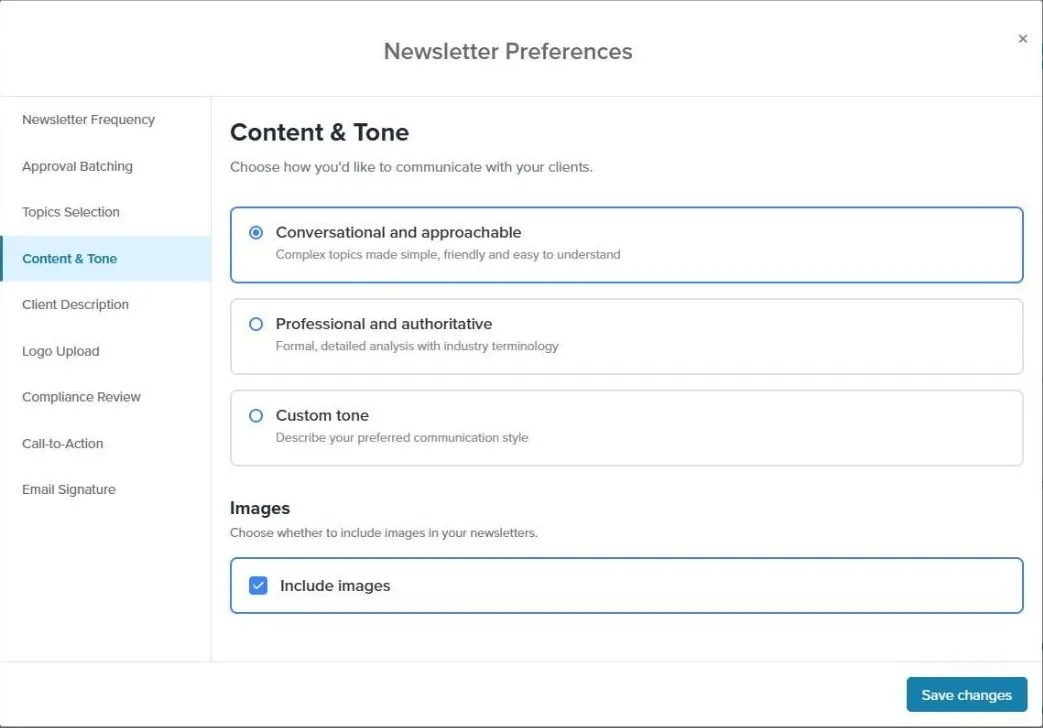
Section titled “Choose Your Writing Style”Pick the tone that matches how you communicate with prospects:
- Conversational and approachable: Complex topics made simple, friendly and easy to understand
- Professional and authoritative: Formal, detailed analysis with industry terminology
- Custom tone: Describe your preferred communication style
- Website URL (optional): Add your website URL to personalize your tone, style and voice
Under Images, Include images is on by default. Turn it off if you’d rather your newsletters didn’t include images. Changes apply to newsletters created after you save.
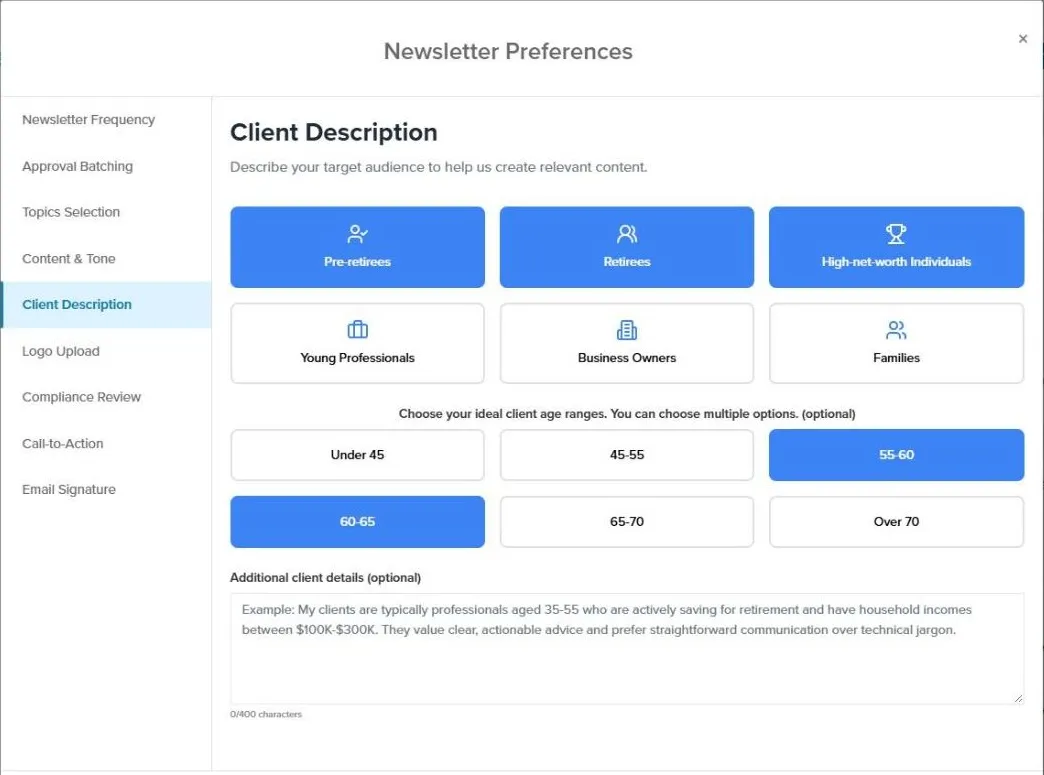
Describe Your Ideal Client
Section titled “Describe Your Ideal Client”Describe who the newsletter is written for (your typical client, focus areas, and anything OAT should keep in mind when writing).
Upload Your Logo
Section titled “Upload Your Logo”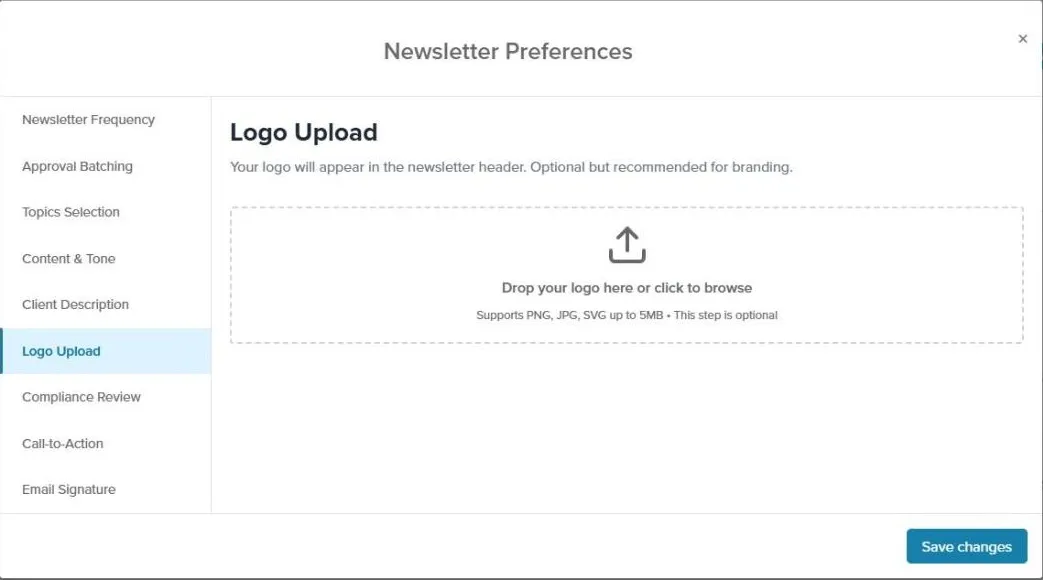
Upload your firm logo so newsletters match your branding.
Set Up Your Approval Process
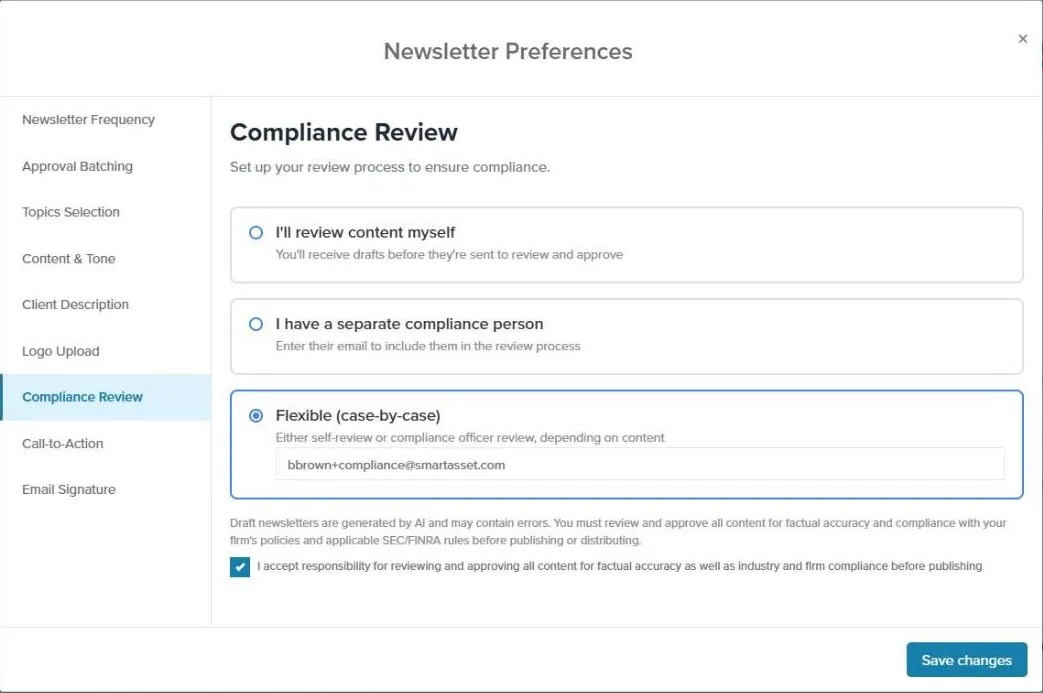
Section titled “Set Up Your Approval Process”Choose one of the following compliance workflows:
| Workflow | Description |
|---|---|
| Self-approval | You review and approve newsletters yourself before they send |
| Dedicated Compliance Person (DCP) | A separate reviewer approves newsletters. Enter the DCP’s email address so they receive review notifications |
| Flexible (case-by-case) | For each newsletter, you decide whether to self-approve or route it to your DCP |
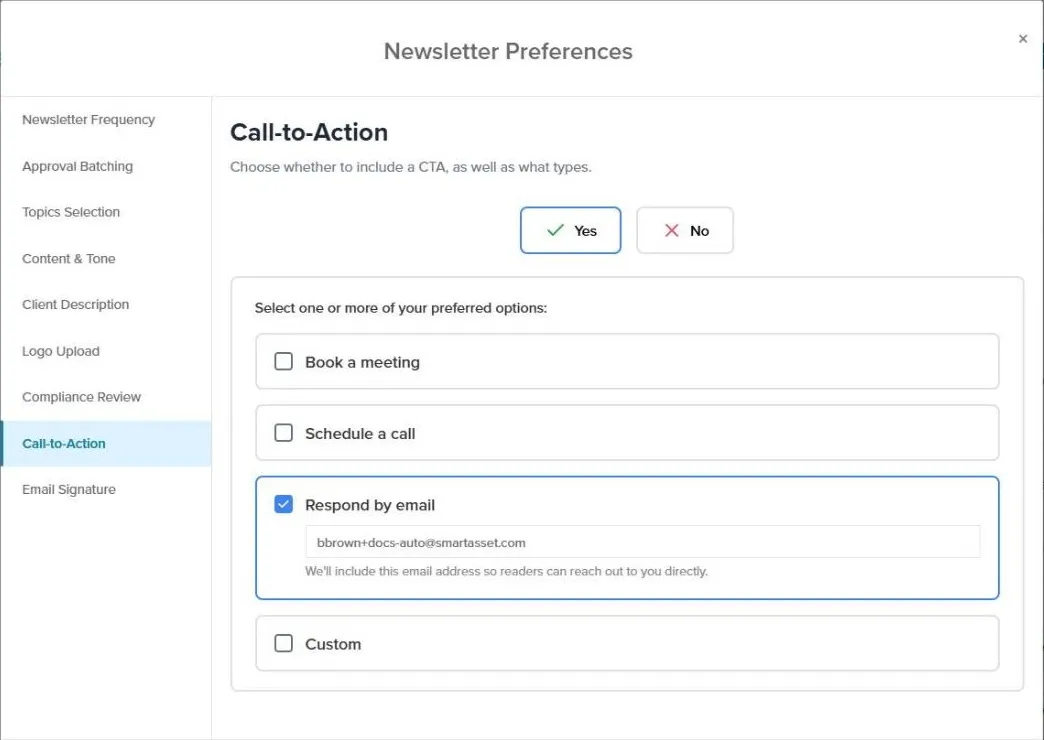
Add Your Call-to-Action
Section titled “Add Your Call-to-Action”Choose what you want readers to do (like “Book a Call”) and add the link where they should go (like your calendar link).
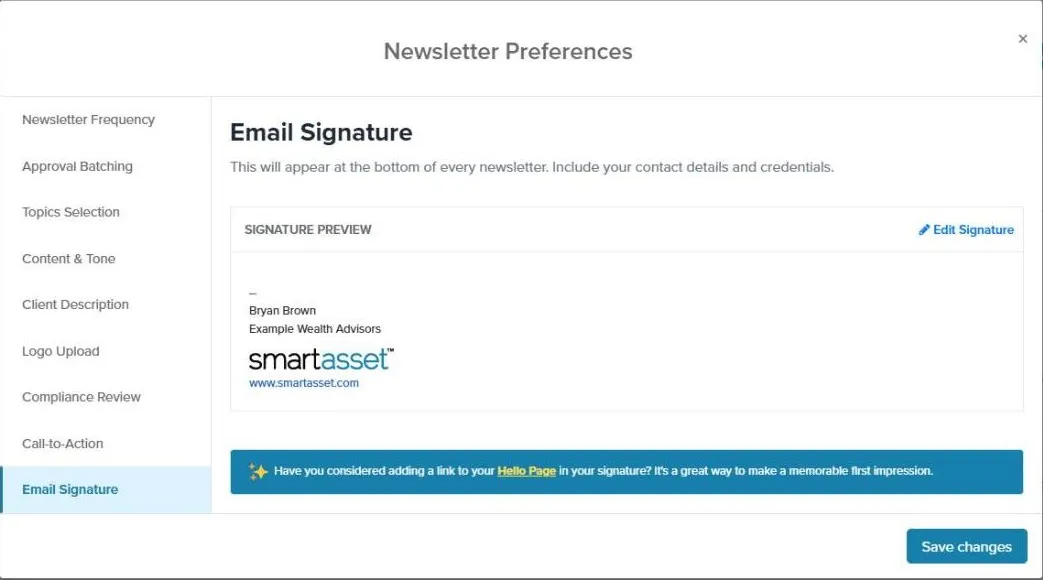
Confirm Your Email Signature
Section titled “Confirm Your Email Signature”Set the signature that appears at the bottom of your newsletters. You can edit your signature or import a new signature in Email Settings.
Step 2: Review and Approve Newsletters
Section titled “Step 2: Review and Approve Newsletters”One your preferences are set, we’ll automatically create newsletter drafts for you. You’ll need to review and approve each one before it sends.
How to Review a Newsletter
Section titled “How to Review a Newsletter”- Open it: Click on the newsletter with “Draft” status
- Read through it: Check the subject line and content
- Make changes (optional): Edit the text, change the topic, or pick a different send date
- Send yourself a test: See exactly how it will look in your inbox
- Approve it: When you’re satisfied, click Approve if you’re reviewing it yourself, or click Request Compliance Review to send it to your reviewer
The Newsletters Page
Section titled “The Newsletters Page”When you click Newsletters, you’ll see three main sections:
- Metrics at the top
- Scheduled Newsletters for upcoming newsletters
- Previous Newsletters for past newsletters
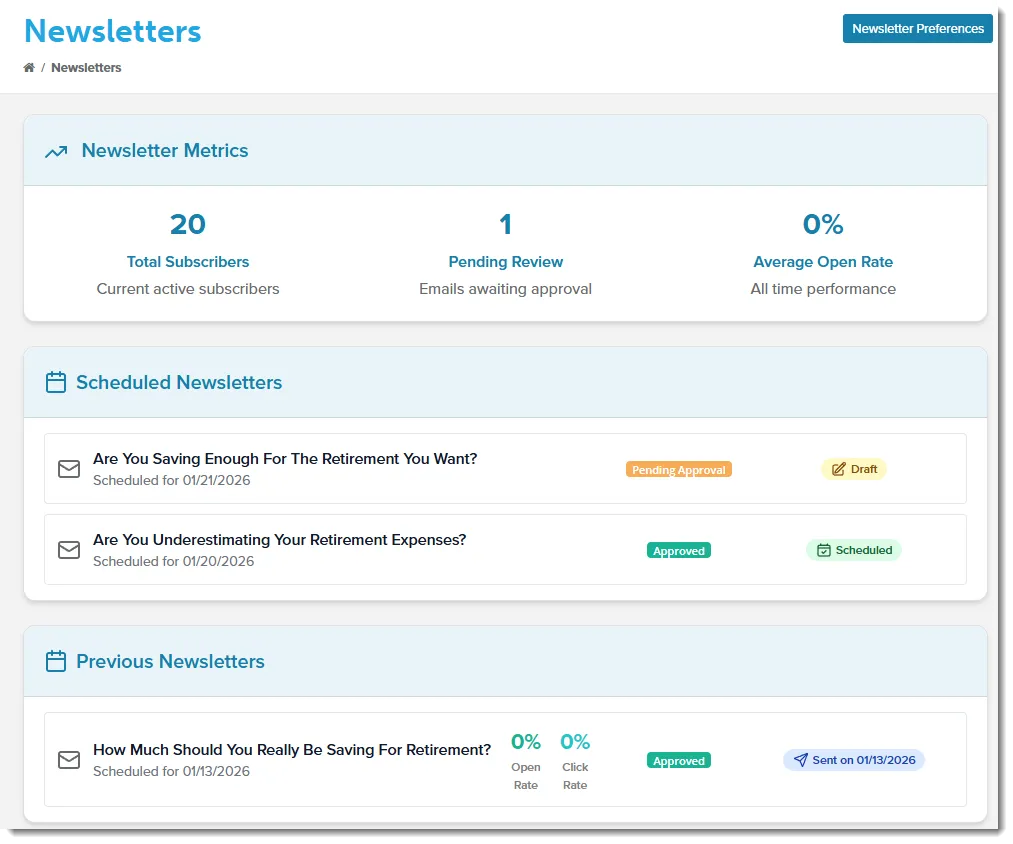
Screenshot of the Newsletters Page
Understanding the Status Labels
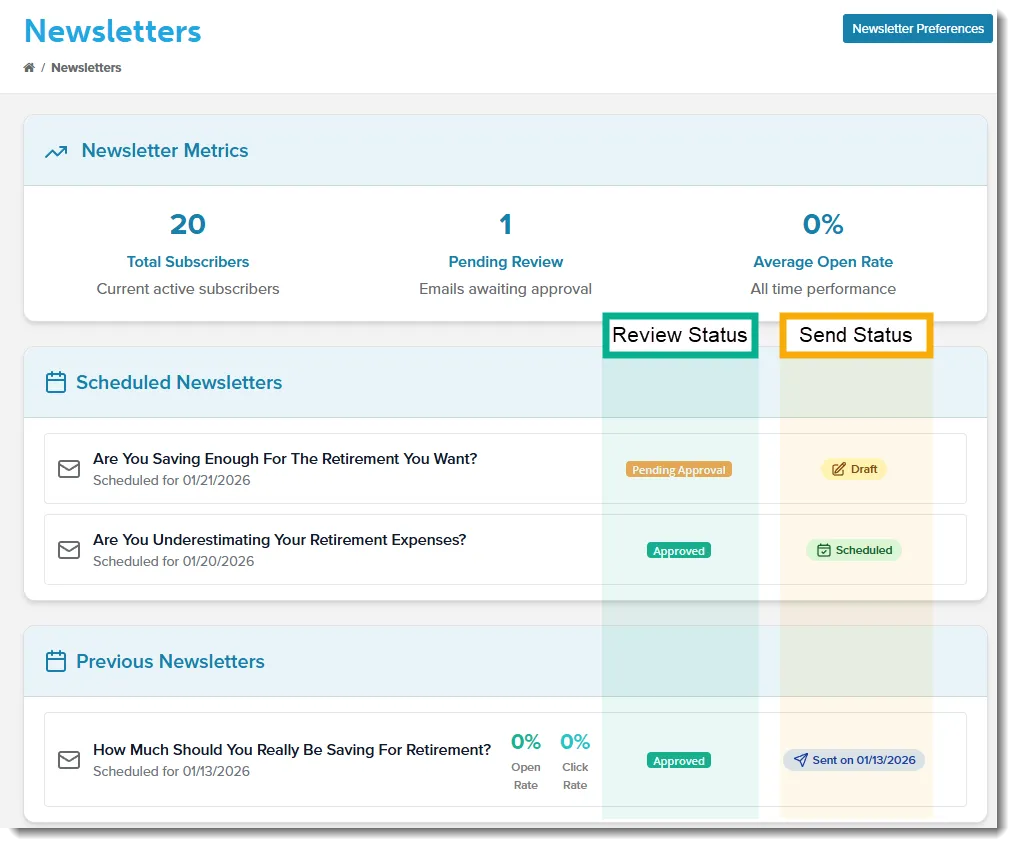
Section titled “Understanding the Status Labels”Each newsletter has two status labels:
- Review Status (compliance workflow)
- Send Status (delivery state)
Definitions
Section titled “Definitions”-
Review Status (compliance workflow)
Label What it means What you need to do Draft Awaiting your initial review Review and approve, or send for compliance review Pending Approval Submitted to your compliance reviewer Wait for the reviewer’s response Changes Requested Your reviewer approved with edits Review the changes, then approve Rejected (Resubmit) Your reviewer rejected the newsletter Make updates and click Request Compliance Review to resubmit Approved Compliance review is complete None -
Send Status (delivery state)
Label What it means What you need to do Draft Not scheduled to deliver yet (still waiting on approval) Approve it (or send for compliance review) to move it forward Scheduled Queued to send on the scheduled date None Late The scheduled send date passed before it was approved Approve it and choose a new send date Sent Successfully delivered to subscribers None (you can view performance metrics) Failed An error occurred while sending Check the failed recipient list for details
When a Newsletter Needs Your Review
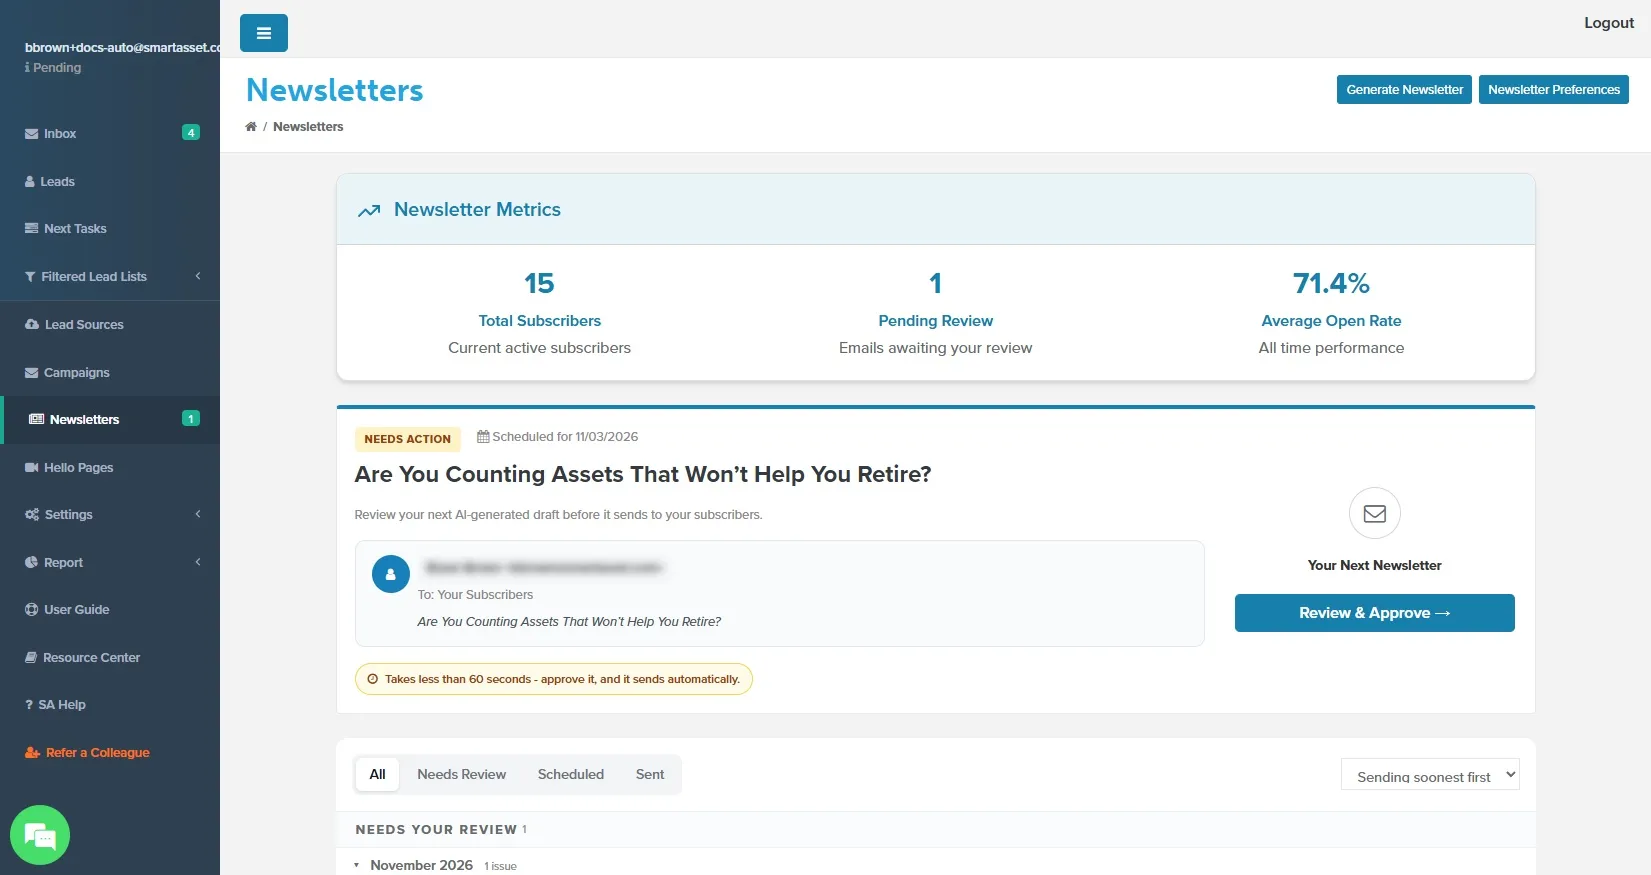
Section titled “When a Newsletter Needs Your Review”When a newsletter draft needs your attention, you’ll see an alert next to Newsletters in the left menu.
Making Changes to a Newsletter
Section titled “Making Changes to a Newsletter”Editing the content
Section titled “Editing the content”- Open the newsletter draft you want to edit
- Click the Edit button to make changes to the content
- Edit the subject line and body content directly. You can adjust wording, add links, or insert images as needed.
Changing the Topic
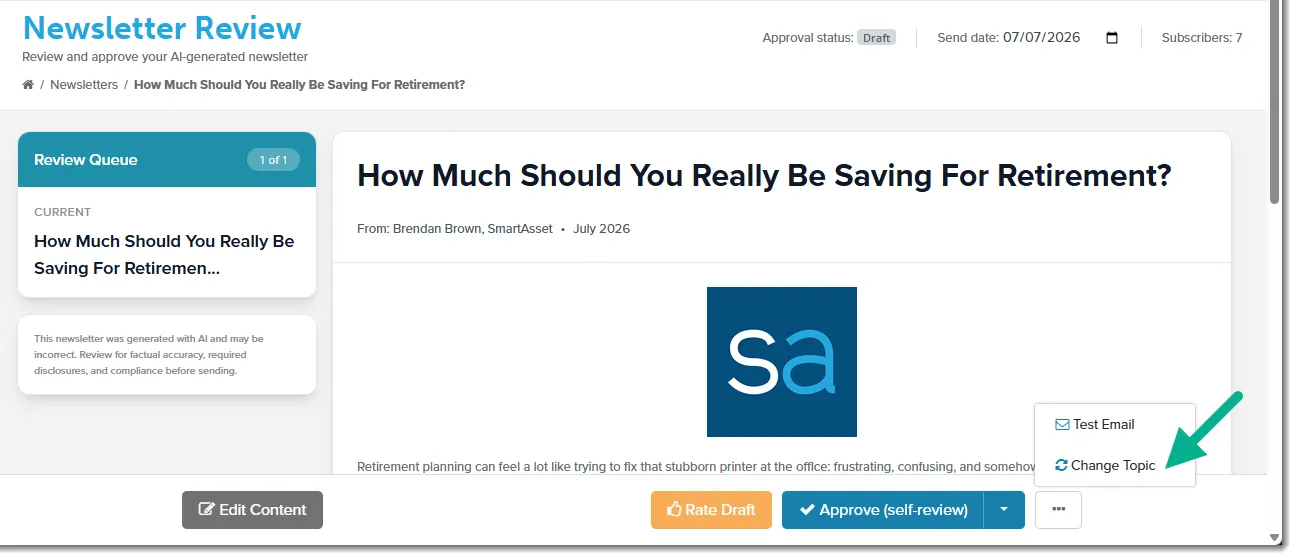
Section titled “Changing the Topic”Don’t like the topic we picked? You can switch to a different one:
- Click Change Topic in the button bar at the bottom of the newsletter draft
- Pick a different topic from the list
Reset to Original (optional)
Section titled “Reset to Original (optional)”If you’ve edited a newsletter and want to return to the original version:
- Open the newsletter draft.
- Click Reset next to Edit in the button bar at the bottom.
- Confirm Reset to discard your edits and restore the original AI-generated content. This can’t be undone.
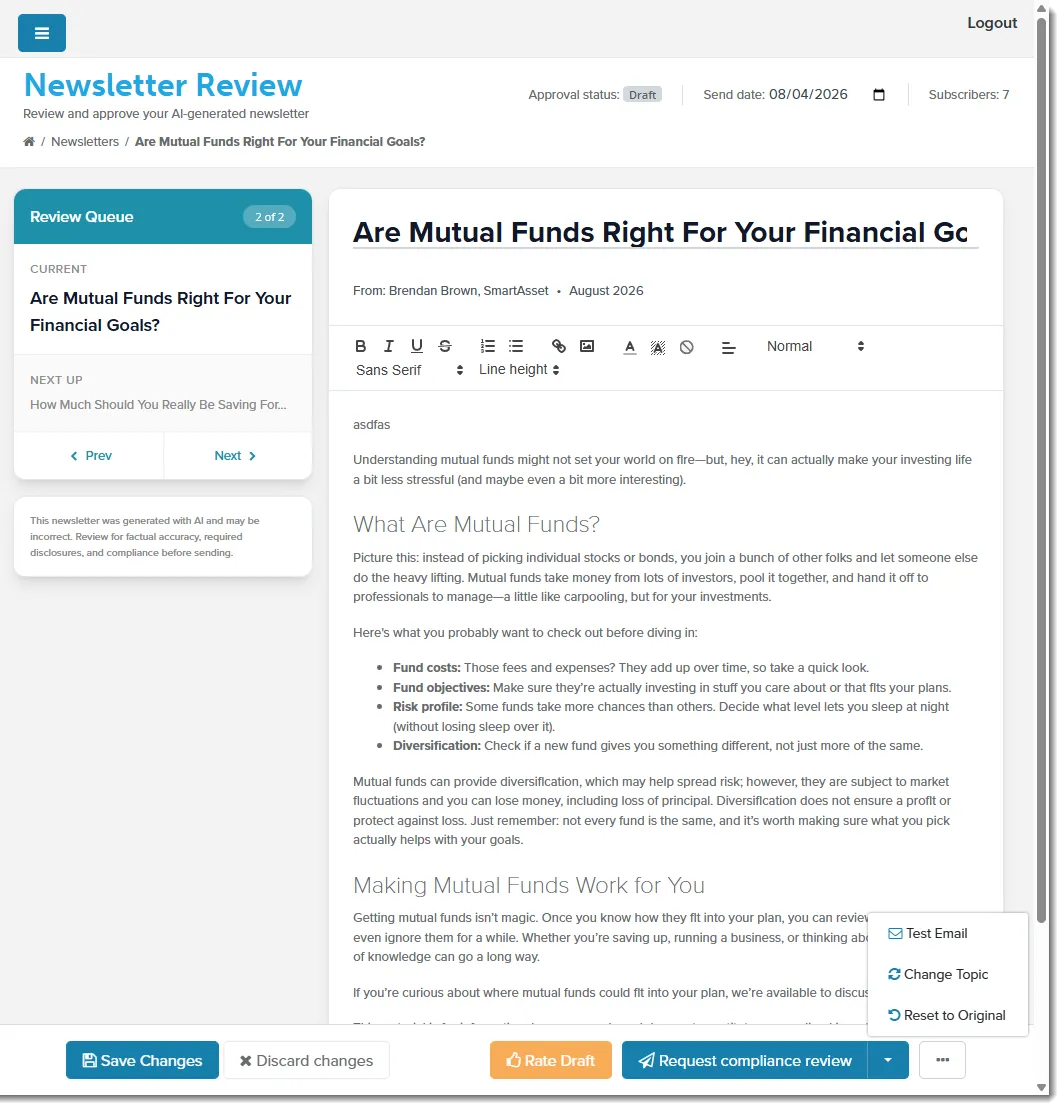
Note: The Reset button only appears after you’ve made changes to the newsletter.
Update the scheduled send date (optional)
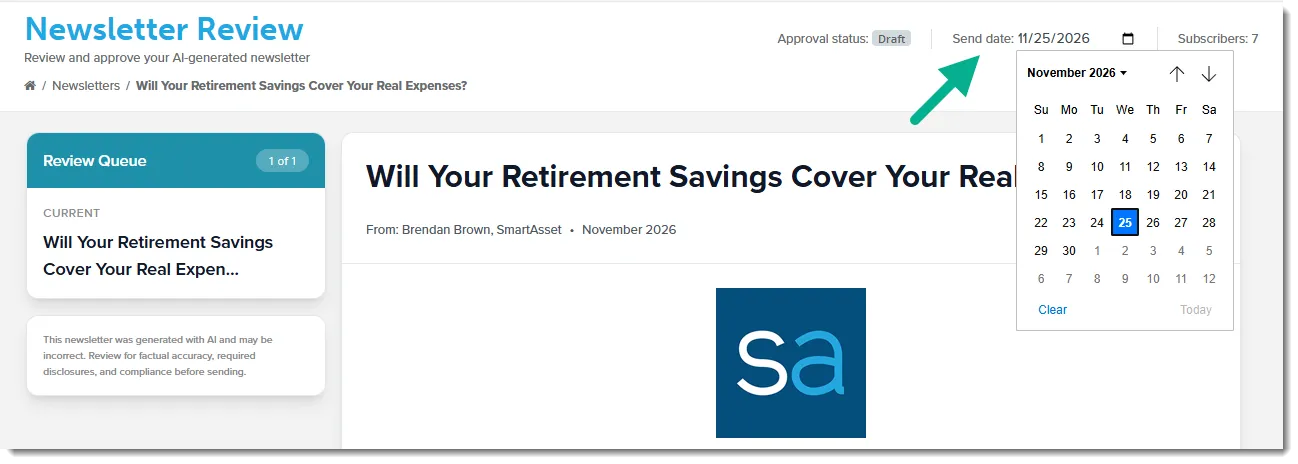
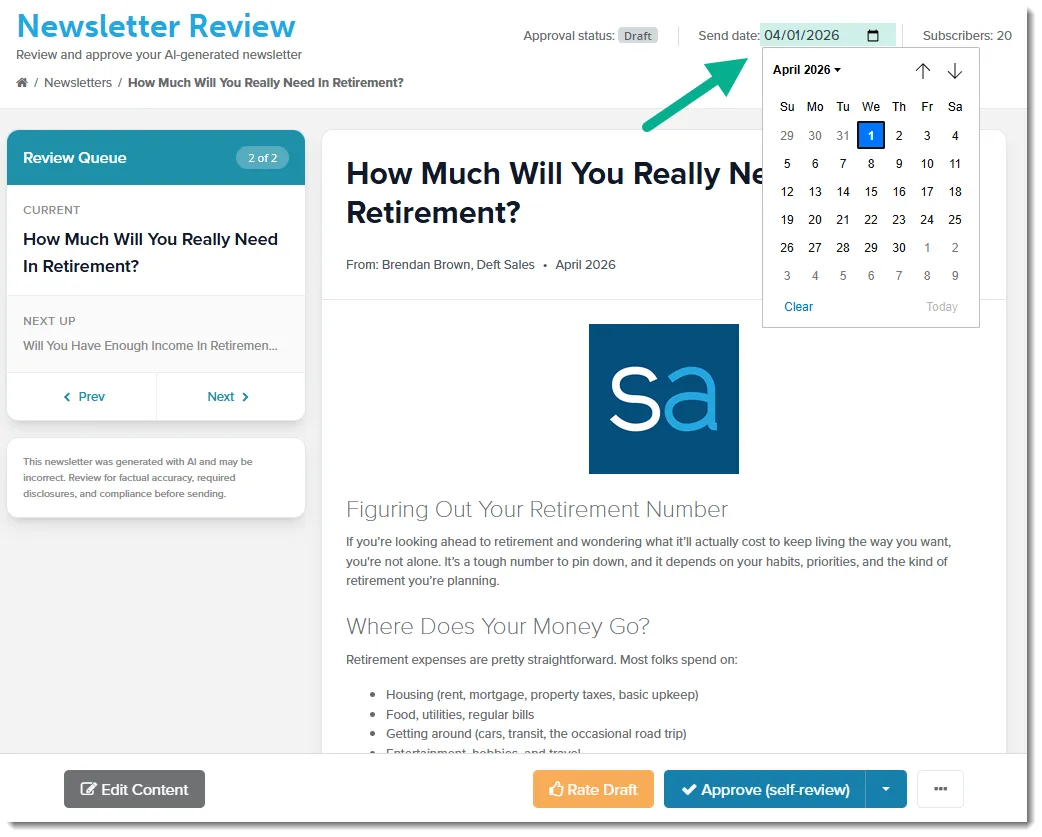
Section titled “Update the scheduled send date (optional)”You can change the scheduled send date before approval.
-
Open the newsletter draft.
-
Use the date picker in the top-right corner to select a new scheduled send date. Your changes save automatically.
Sending a Test Email
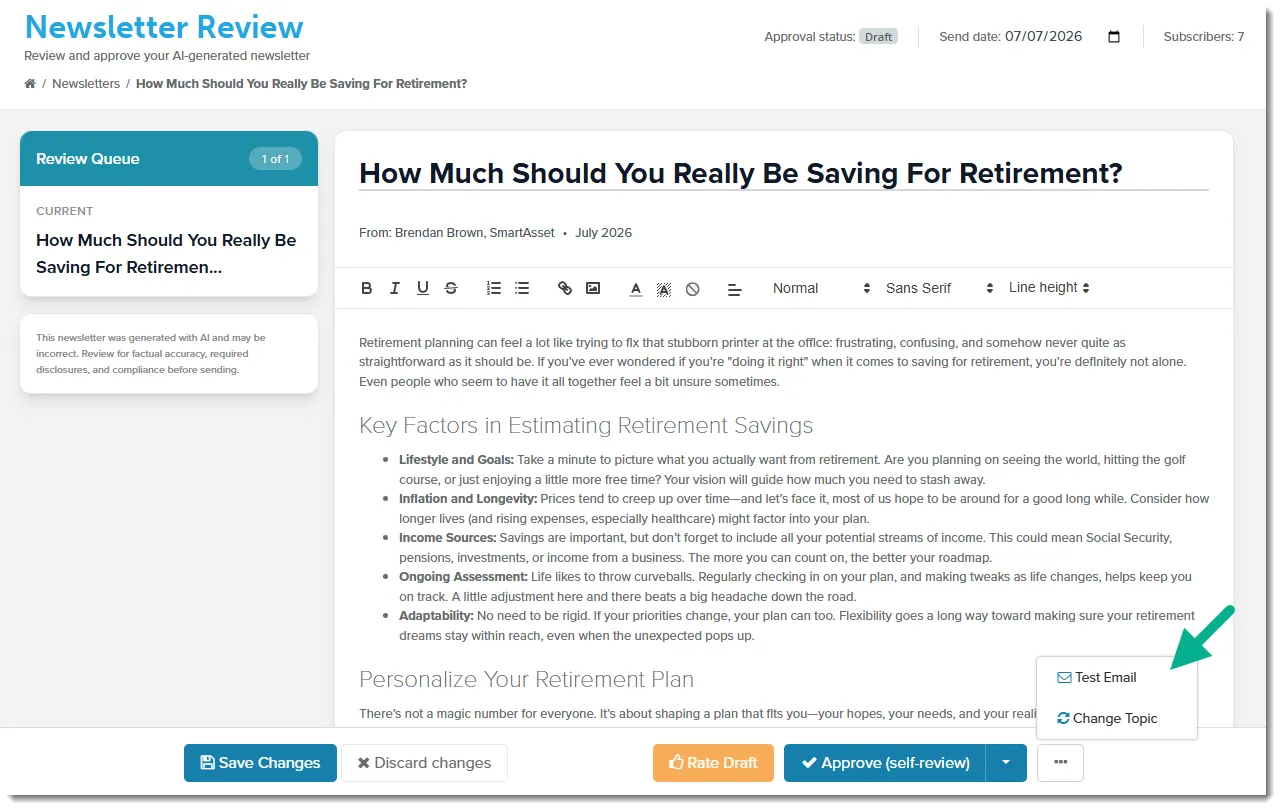
Section titled “Sending a Test Email”Before you approve, send yourself a test to make sure everything looks right:
- Click Send Test
- Check your inbox
- Review the formatting, links, images, and signature
Approving Your Newsletter
Section titled “Approving Your Newsletter”Once you’re satisfied with the newsletter, approve it. The approval options you see depend on your newsletter preferences settings.
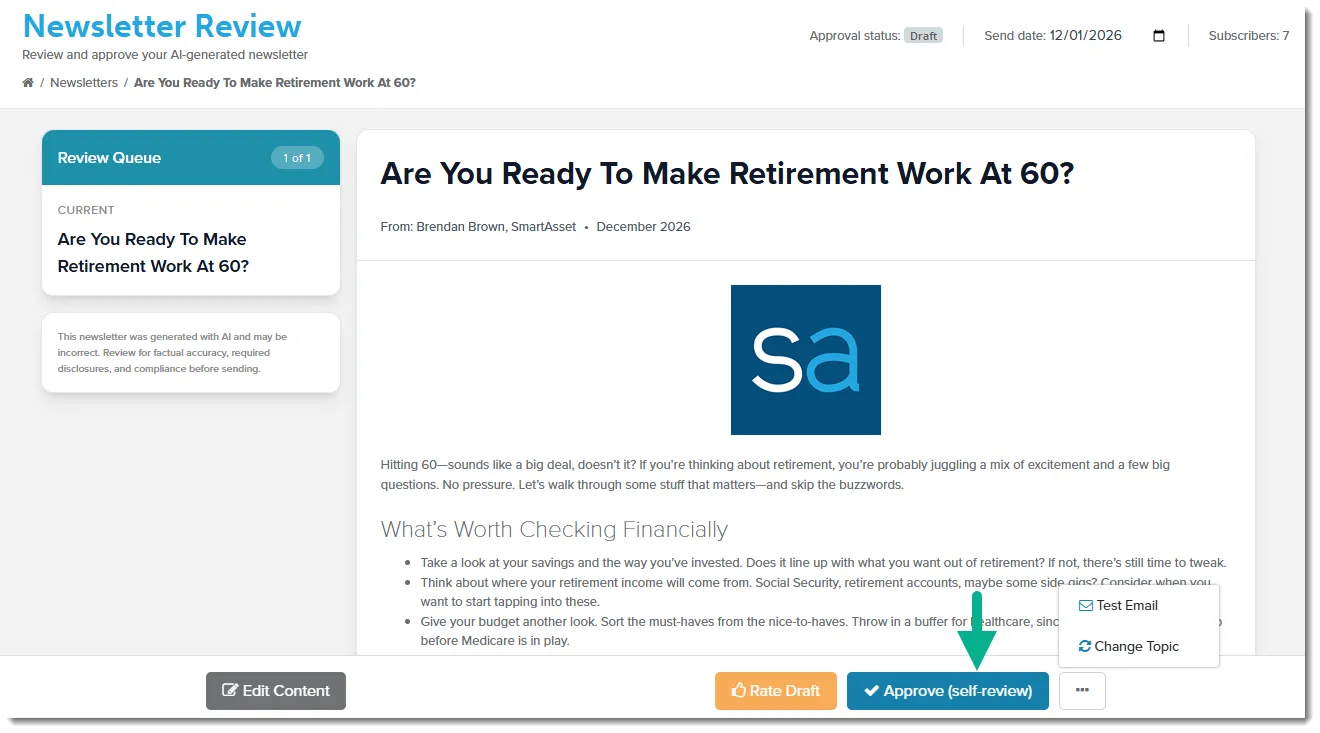
If you review your own newsletters:
Section titled “If you review your own newsletters:”Click Approve and you’re done. The newsletter will send automatically on the scheduled date.
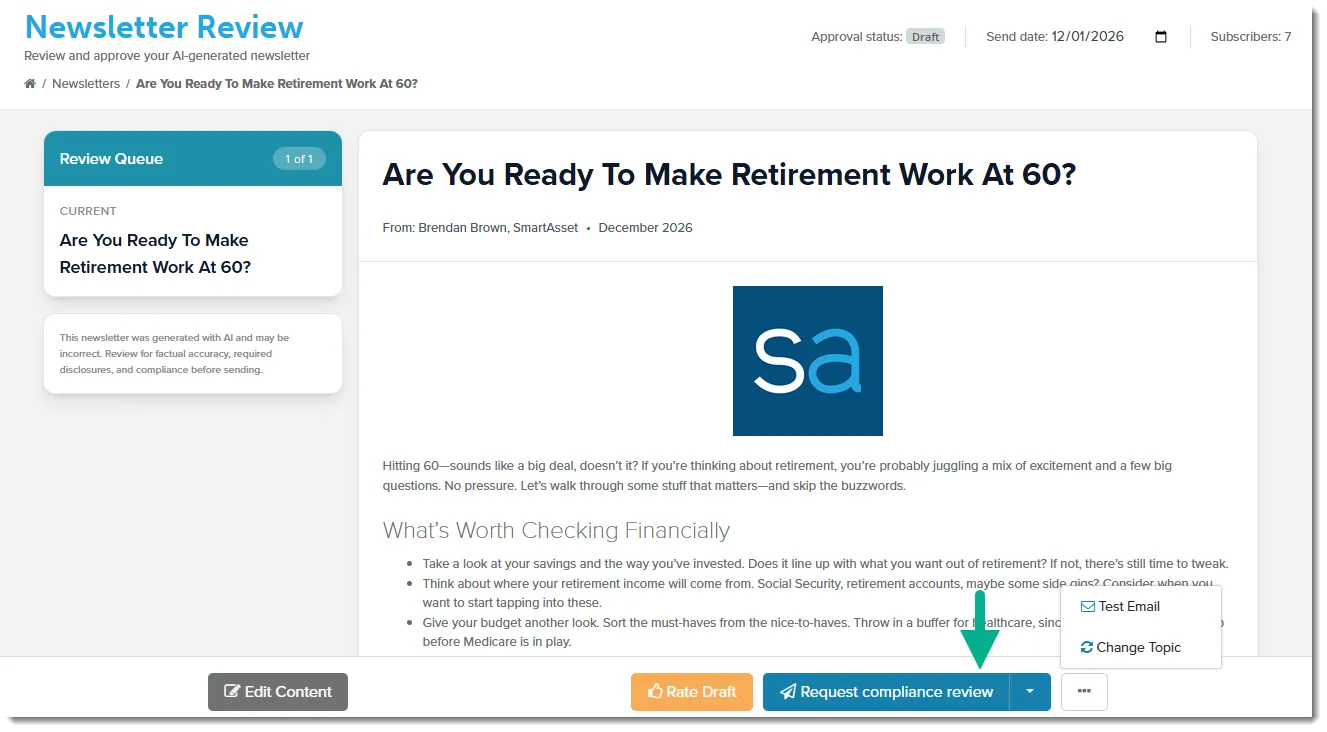
If someone else reviews your newsletters:
Section titled “If someone else reviews your newsletters:”Click Request Compliance Review. Your reviewer will get an email notification and will approve it, suggest changes, or ask you to revise it. If they reject it, you’ll see their feedback. Make the changes they asked for, then click Request Compliance Review again to resubmit.
What happens after compliance review?
If you turned on newsletter notifications, you’ll receive an email when your reviewer finishes their review:
- Approved: You’ll get a confirmation that your newsletter is ready to send.
- Approved with changes: You’ll get an email showing what your reviewer changed. You’ll need to give final approval.
- Rejected: You’ll get an email explaining what to fix. Make the requested changes, then click Request Compliance Review again to resubmit.
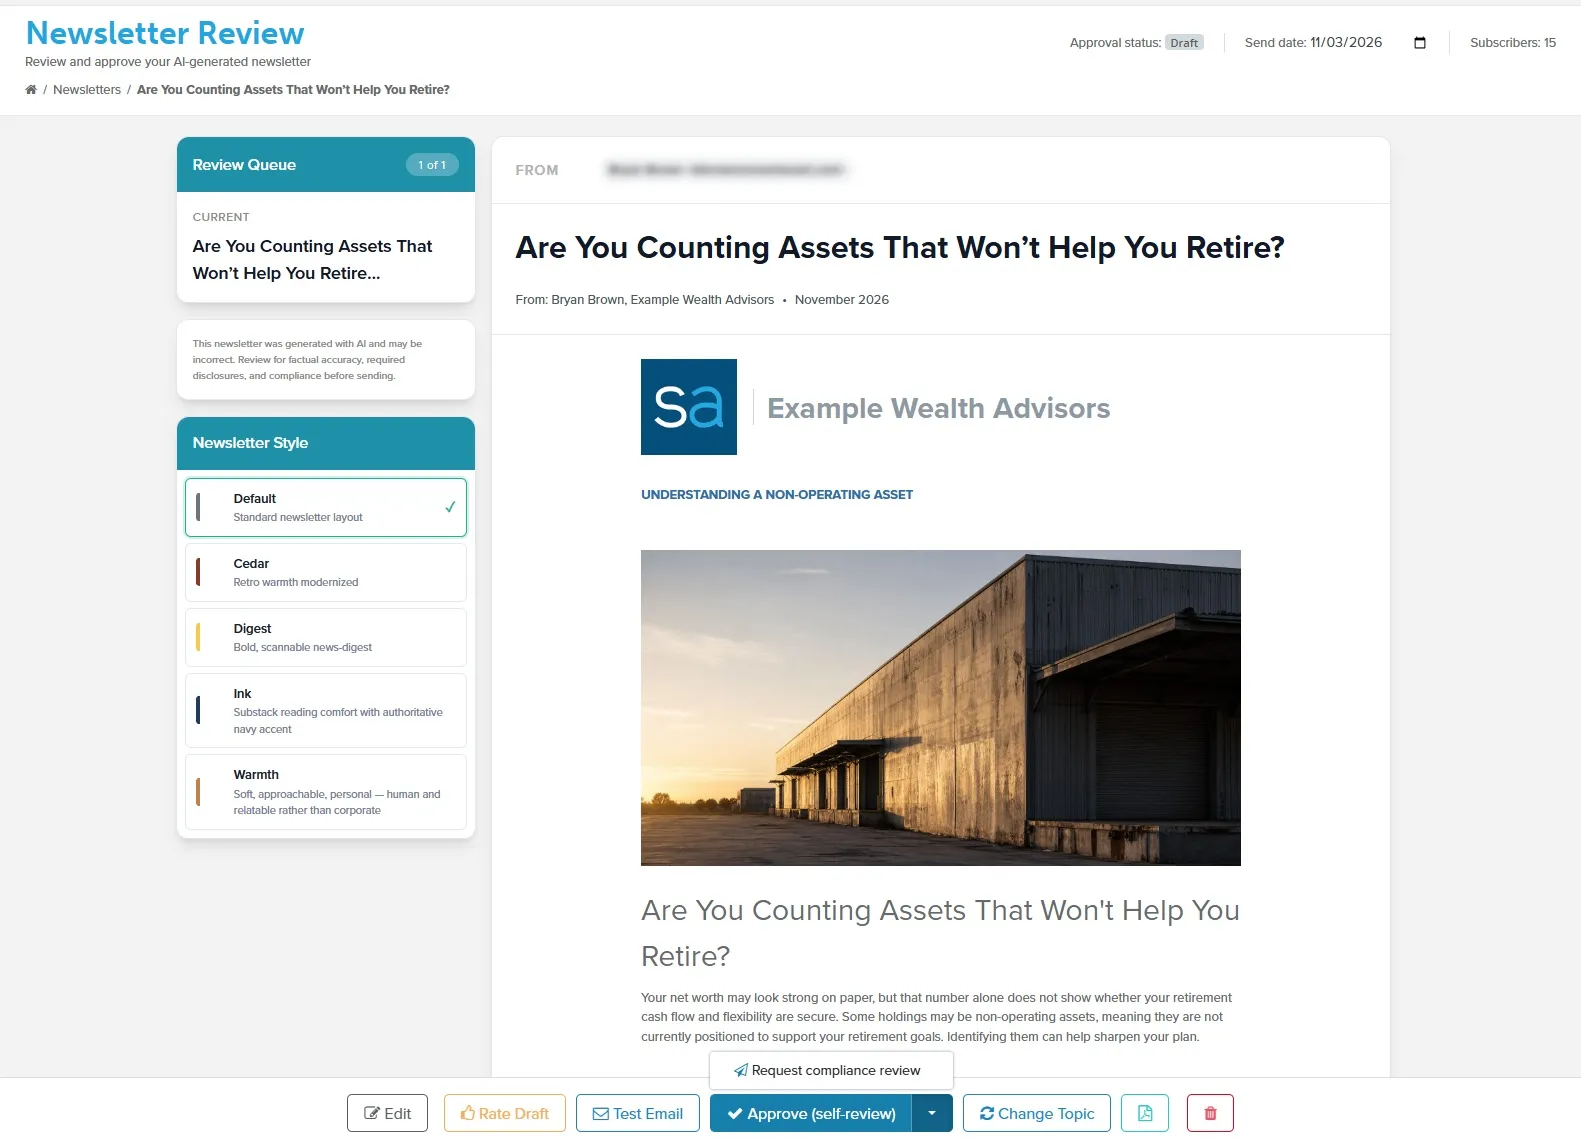
If you choose on a case-by-case basis (Flexible workflow):
Section titled “If you choose on a case-by-case basis (Flexible workflow):”You’ll see both options. Click Approve (self-review) to approve it yourself, or click the arrow next to it and choose Request compliance review to send it to your reviewer.
Step 3: Manage subscribers
Section titled “Step 3: Manage subscribers”Viewing your subscriber list
Section titled “Viewing your subscriber list”You can see your subscribers in Filtered Lead Lists in the left menu. If you don’t see it, click View All.
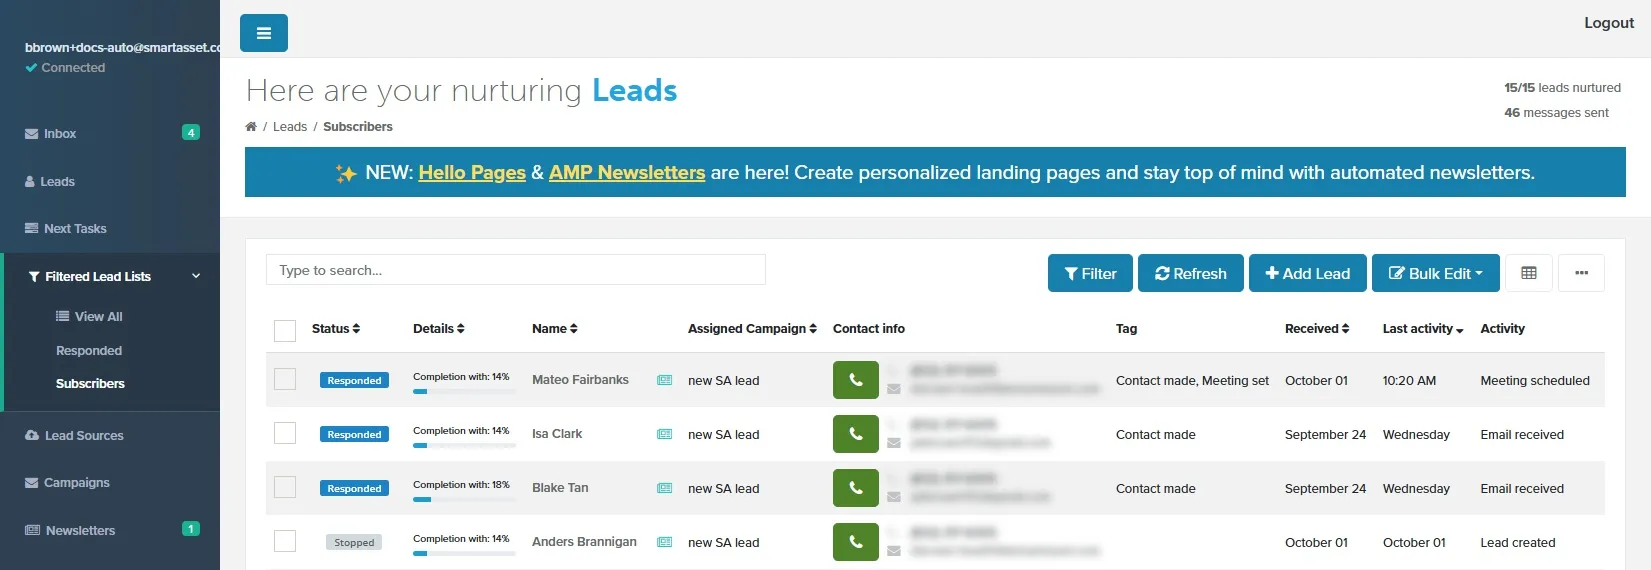
There are three ways to subscribe leads to newsletters.
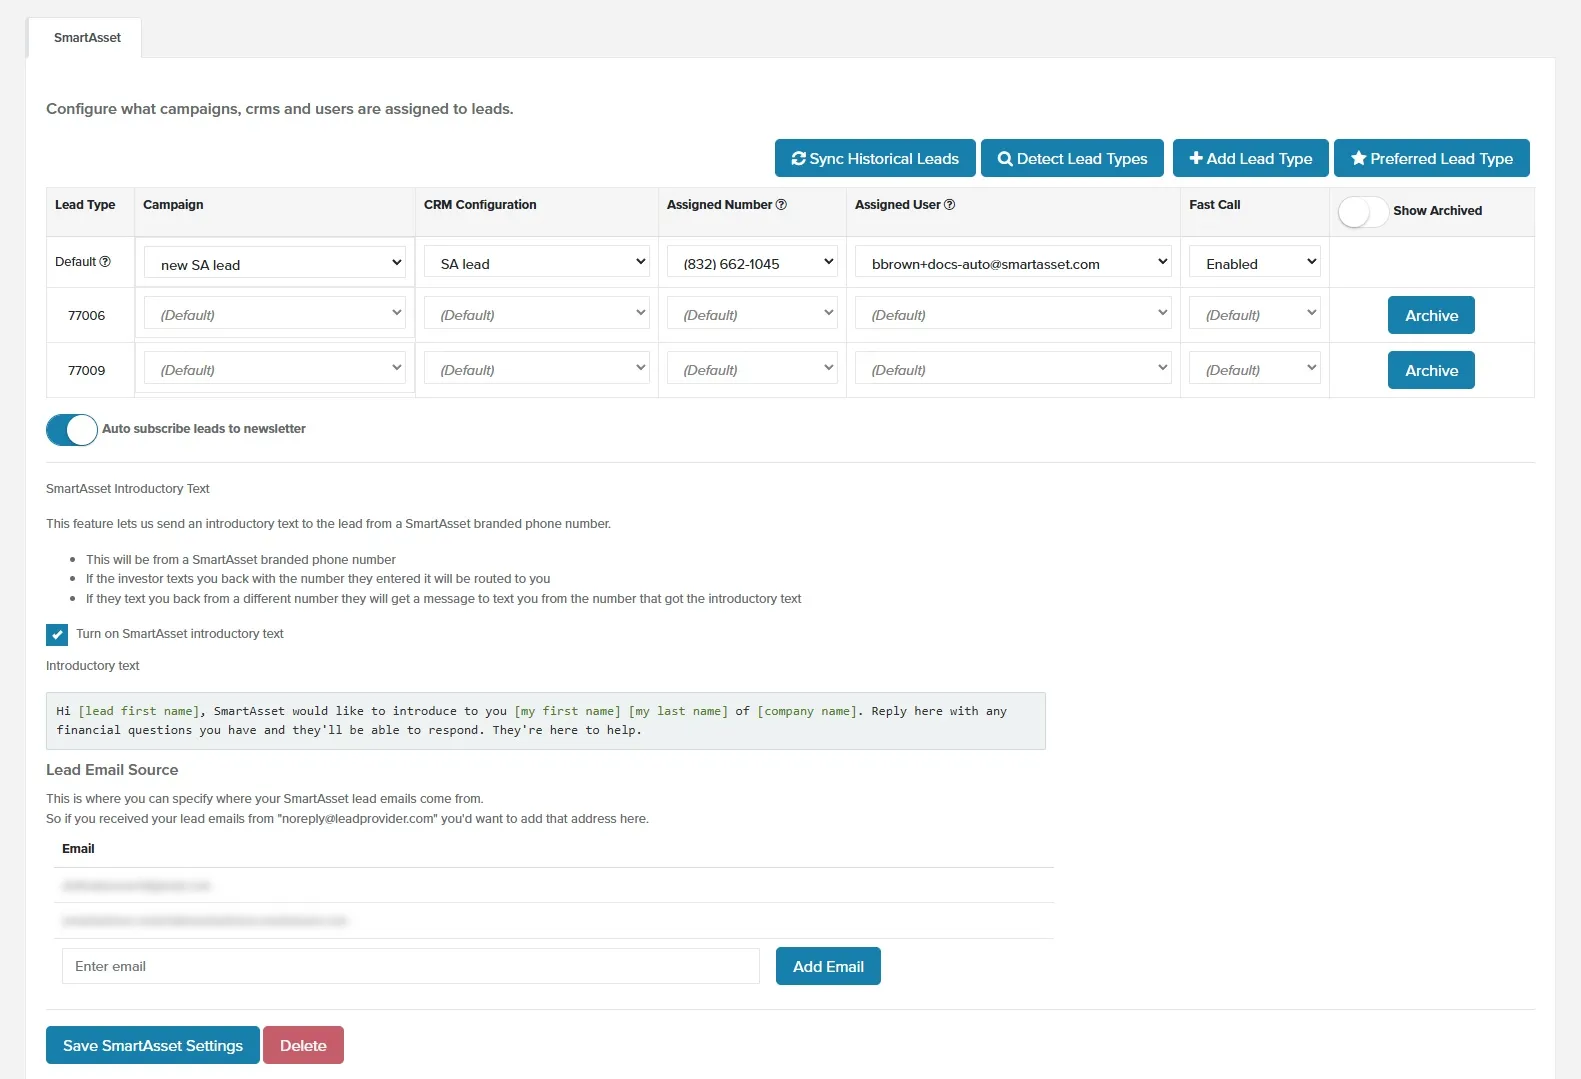
Automatically Subscribe New Leads
Section titled “Automatically Subscribe New Leads”Use this when you want new leads to be subscribed automatically.
- Go to Lead Sources.
- Turn on the Auto subscribe leads to newsletter switch, directly below the lead source table.
- At the bottom of the page, click Save SmartAsset Settings.
Add Multiple Subscribers at Once
Section titled “Add Multiple Subscribers at Once”Use this to subscribe many existing leads at once.
- Go to Leads.
- Select one or more leads using the checkboxes.
- Click Bulk Edit.
- Select Assign Newsletter.
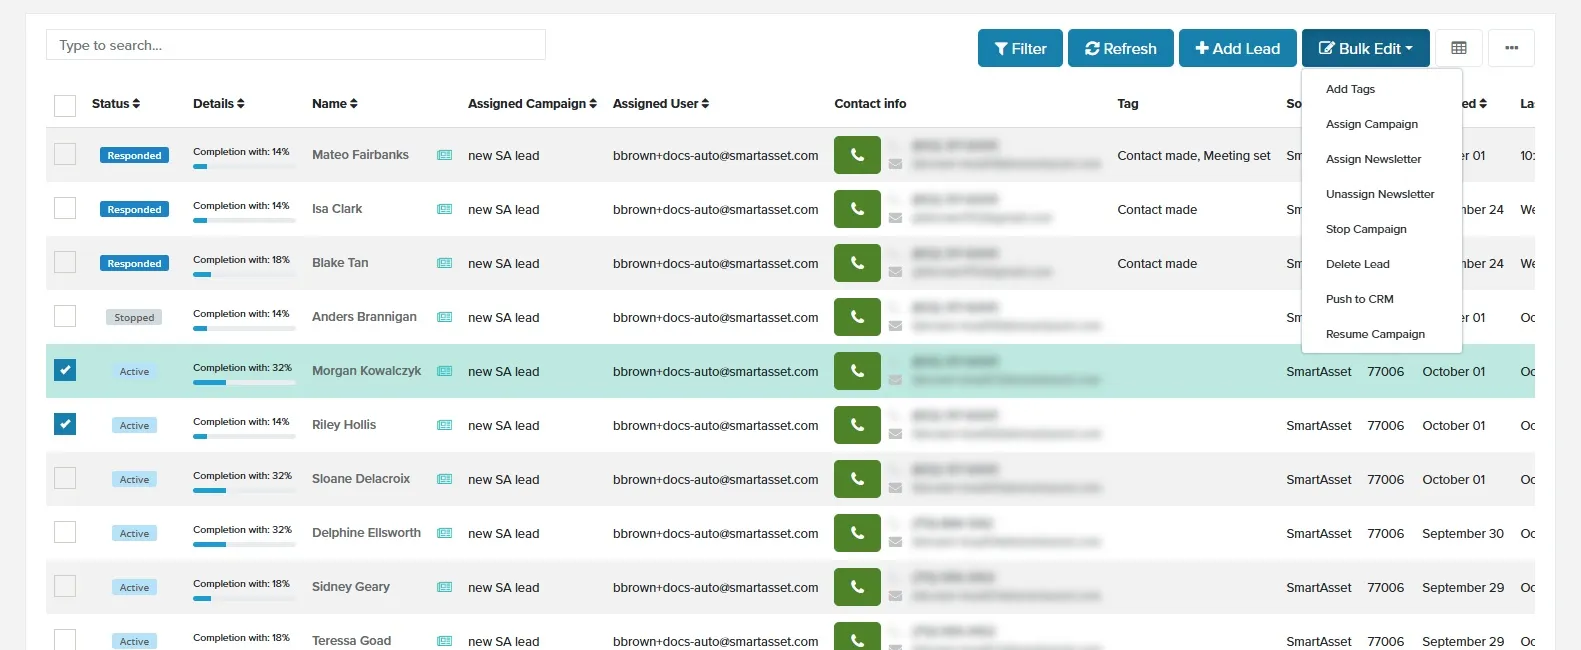
From the Leads page, use Bulk Edit → Assign Newsletter to subscribe multiple leads at once.
Subscribe One at a Time
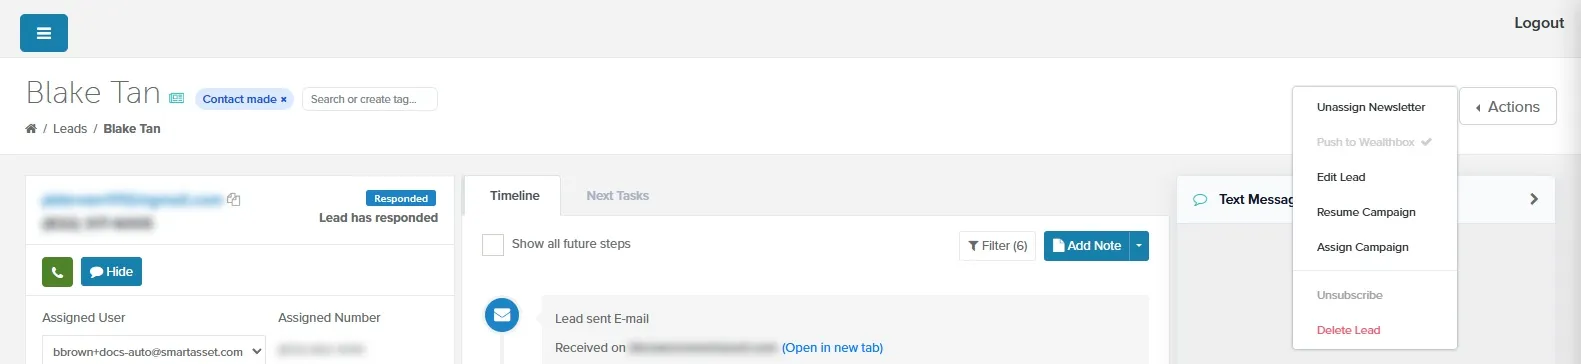
Section titled “Subscribe One at a Time”Use this for one-off subscriber updates.
- Go to Leads.
- Click a lead’s name to open the Lead Details page.
- Click Actions, then Assign Newsletter. If the lead is already subscribed, the menu shows Unassign Newsletter instead.
Step 4: See Who Engaged
Section titled “Step 4: See Who Engaged”After a newsletter is sent
Section titled “After a newsletter is sent”Once a newsletter is sent, it moves from Scheduled Newsletters to Previous Newsletters. This is where you can review performance details like open rate and click rate.
Newsletters page metrics
Section titled “Newsletters page metrics”At the top of the Newsletters page, you’ll see summary metrics across all newsletters:
-
Total Subscribers: The number of people who receive your newsletters
-
Pending Review: The number of newsletters waiting for approval
-
Average Open Rate: The percent of recipients who open your newsletters

Newsletter lists
Section titled “Newsletter lists”-
Scheduled Newsletters: Upcoming newsletters (Draft, Approved, Scheduled, Late)
-
Previous Newsletters: Newsletters that have already been sent
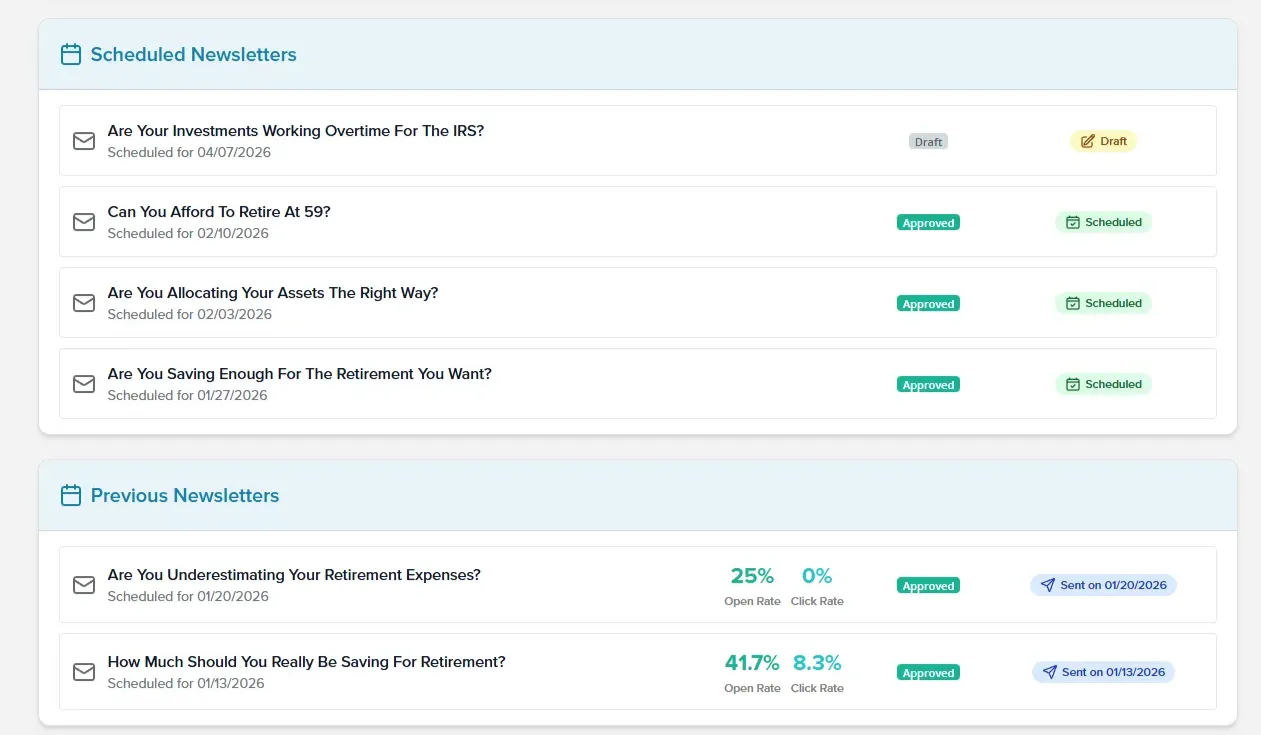
View results for a sent newsletter
Section titled “View results for a sent newsletter”Click any newsletter in Previous Newsletters to view its:
- Recipients: Everyone the newsletter was sent to
- Opens: Who opened it
- Link clicks: Who clicked a link
When will I receive my first newsletter?
Section titled “When will I receive my first newsletter?”After you set up your preferences, we’ll create your first newsletter right away. It will be scheduled to send two months later, giving you plenty of time to review and make changes.
After that, we’ll keep creating newsletters based on how often you chose to send them (weekly, bi-weekly, or monthly). You’ll always have at least a month to review each one before it goes out.
Can I add older leads to the newsletter?
Section titled “Can I add older leads to the newsletter?”Yes, unless they are already Unsubscribed.
How do I change how often newsletters are created?
Section titled “How do I change how often newsletters are created?”Two settings control this, both under Newsletters → Newsletter Preferences:
- Newsletter Frequency sets how often newsletters are sent.
- Approval Batching sets how many months of drafts are created for your review at once.
Update either tab and click Save changes. If you changed either one, you’ll be asked to review the new send dates before your changes are saved.

Can I pick a different topic for a newsletter?
Section titled “Can I pick a different topic for a newsletter?”Yes. If you do not like the topic we selected, you can change it by clicking Change Topic in the button bar at the bottom of the newsletter draft, and then choosing a different topic from the list.
Can I change when the newsletter will be sent?
Section titled “Can I change when the newsletter will be sent?”Yes. Open the newsletter draft and use the date picker in the top-right corner to select a new scheduled send date. Your changes save automatically.
How does Flexible (case-by-case) compliance work?
Section titled “How does Flexible (case-by-case) compliance work?”When you select Flexible (case-by-case) in Compliance Review, you can choose to approve the newsletter yourself or request compliance review each time you review a draft.

Screenshot showing approval options for flexible compliance workflow.
Will I get an email when compliance reviews my newsletter?
Section titled “Will I get an email when compliance reviews my newsletter?”Yes. If you have newsletter notifications enabled, you’ll get an email when compliance completes their review:
- Approved: Confirmation that your newsletter is approved and ready to send.
- Approved with changes: Details about what the reviewer changed.
- Rejected: What you need to fix before resubmitting.
You can manage this in Settings under newsletter notifications.
Can newsletters run alongside campaigns?
Section titled “Can newsletters run alongside campaigns?”Yes. Newsletters are a separate channel and do not replace campaigns. They can run at the same time.
Can a lead be subscribed while they’re in an active campaign?
Section titled “Can a lead be subscribed while they’re in an active campaign?”Yes. Newsletters and campaigns can run at the same time.
What happens when a lead responds?
Section titled “What happens when a lead responds?”If the lead is in an active campaign, the campaign stops automatically. However, the lead will still get your newsletters. Newsletters continue until the lead unsubscribes.
What happens when a lead unsubscribes?
Section titled “What happens when a lead unsubscribes?”If a lead clicks unsubscribe in a newsletter email, they are unsubscribed from both newsletter and campaign emails. The same applies in reverse: unsubscribing from a campaign email also unsubscribes them from newsletters.
Getting Help
Section titled “Getting Help”Email amphelp@smartasset.com or use the in-app chat.