

Campaigns
A campaign is a sequence of outreach steps: emails, text messages, and calls. Depending on what your firm allows, each email or text step either sends automatically or appears as a task on your Next Tasks page for you to send yourself. Call steps always appear as tasks.
When a lead responds by replying, calling, or booking a meeting, their status changes to Responded and the remaining steps stop.
Before you begin
Section titled “Before you begin”- Campaigns appears only if your firm allows at least one of emailing, texting, or calling. If you don’t see it, email amphelp@smartasset.com.
- To have OAT send campaign emails for you, connect your email first. See Connect your Email.
The Campaigns Screen
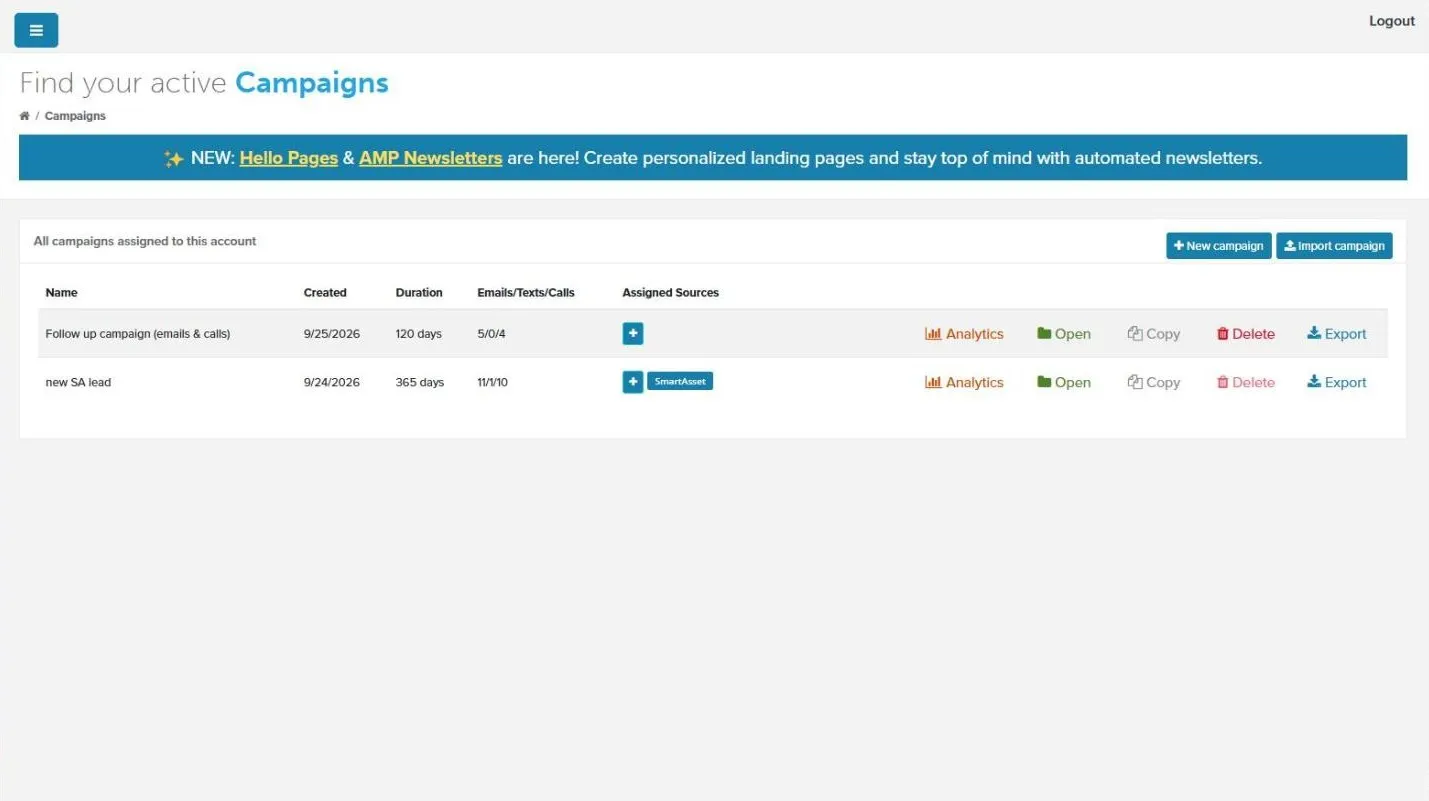
Section titled “The Campaigns Screen”To open this page, go to Campaigns. It lists every campaign in your company, with its creation date, duration, number of emails, texts, and calls, and assigned lead sources.
From this screen you can:
- Click New campaign to create a campaign.
- Click Import campaign to add a campaign from a file exported with Export.
- Click Open, Copy, Delete, or Export on a campaign’s row. Delete is unavailable while the campaign is assigned to a lead source.
- Click Analytics on a campaign’s row to see how it performs. See Campaign Analytics.
Building Your Campaign
Section titled “Building Your Campaign”A campaign is made up of steps that run in order. Each step can be an email, a text message, or a call. A step’s timing counts from when the campaign starts, in minutes, hours, or days. Call and text steps can be scheduled up to 3 months out. Steps only run while the lead hasn’t responded.
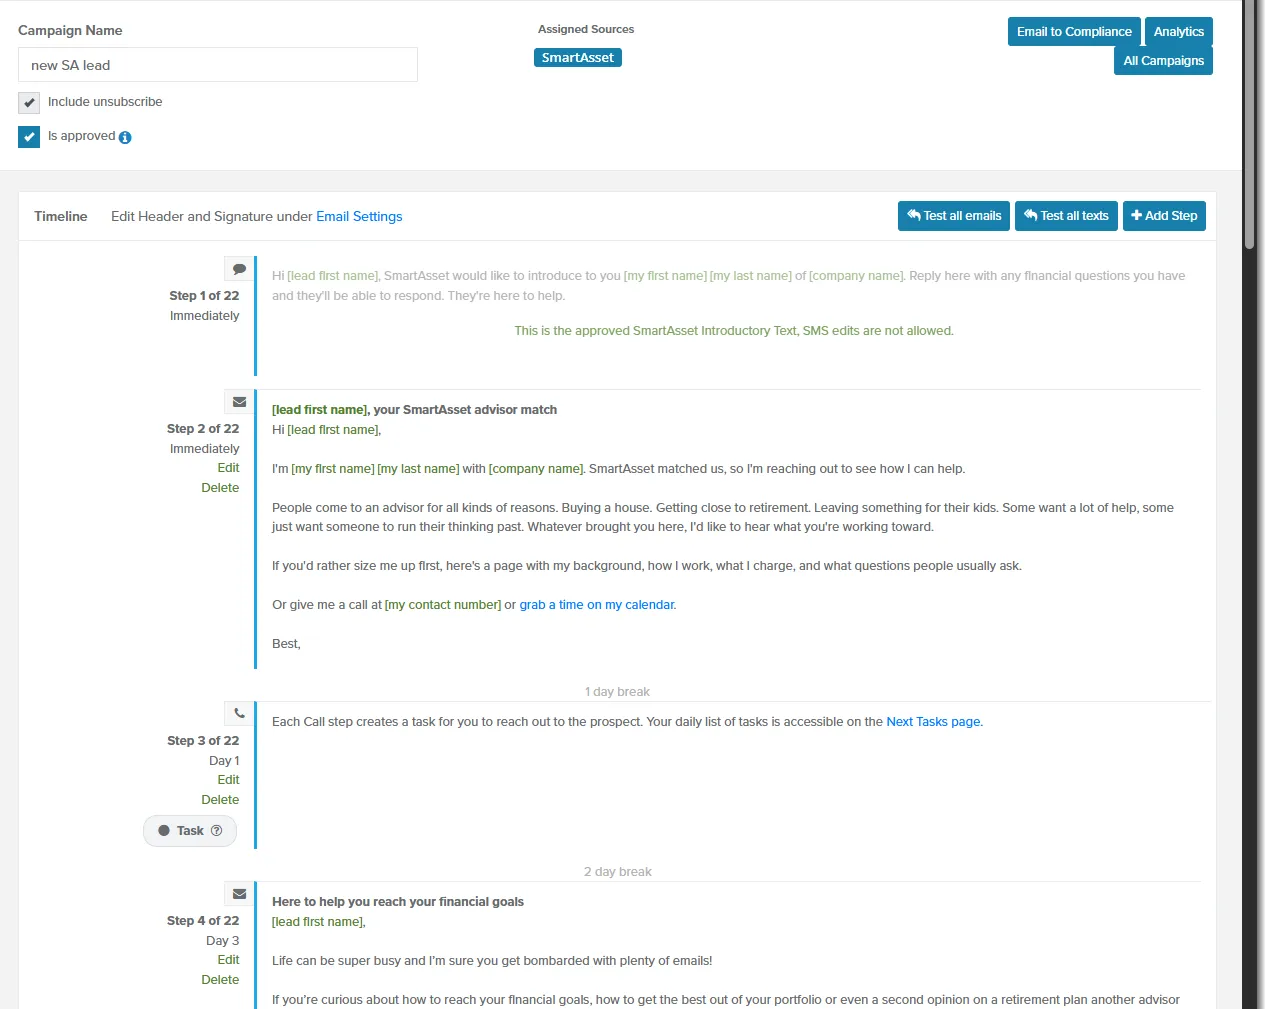
What happens when a step comes due depends on its type and your permissions:
- Emails and texts send automatically if your firm allows it. Otherwise, they appear on your Next Tasks page for you to copy, send yourself, and mark completed. Email and text permissions are independent, so one channel may send automatically while the other becomes tasks.
- Calls always appear on your Next Tasks page, where you can dial the lead with one click.
Edit Your Campaign
Section titled “Edit Your Campaign”Your account comes with a campaign that’s ready to use. In most cases, you only need to edit its messages so they sound like you. Write each step as a personal follow-up to someone who hasn’t replied yet, and say clearly how you can help.
- On the Campaigns page, click Open on the campaign’s row. The campaign page opens.
- Click Edit under the step you want to change.
- Change the message or the step’s timing.
- Click Save. The step updates in the timeline.
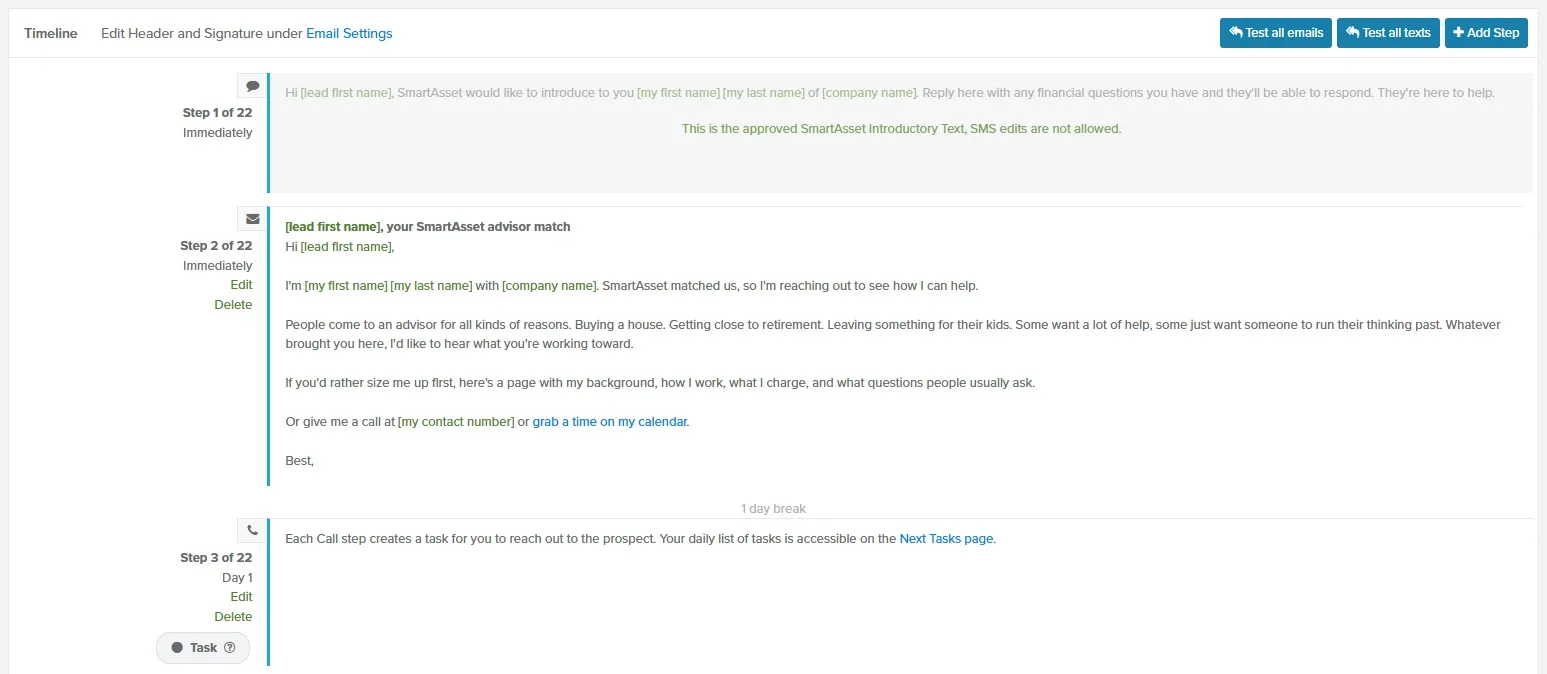
To add a step, click Add Step and choose Email, SMS, or Call. To remove a step, click Delete under it. You can’t edit the SmartAsset introductory text step.
Create a New Campaign
Section titled “Create a New Campaign”To keep your current campaign and try a different version, click Copy on its row, then edit the copy. To start from a blank campaign, click New campaign, enter a name, and click Add. The new campaign appears in the list; click Open to add its steps.
Add Videos to Your Emails
Section titled “Add Videos to Your Emails”If your firm uses Hello Pages, the easiest way to add a video is to add your Hello Page to the email. Click Add Hello Page in the email step. The email shows a moving preview of your video that opens your Hello Page. For step-by-step instructions, see Hello Pages.
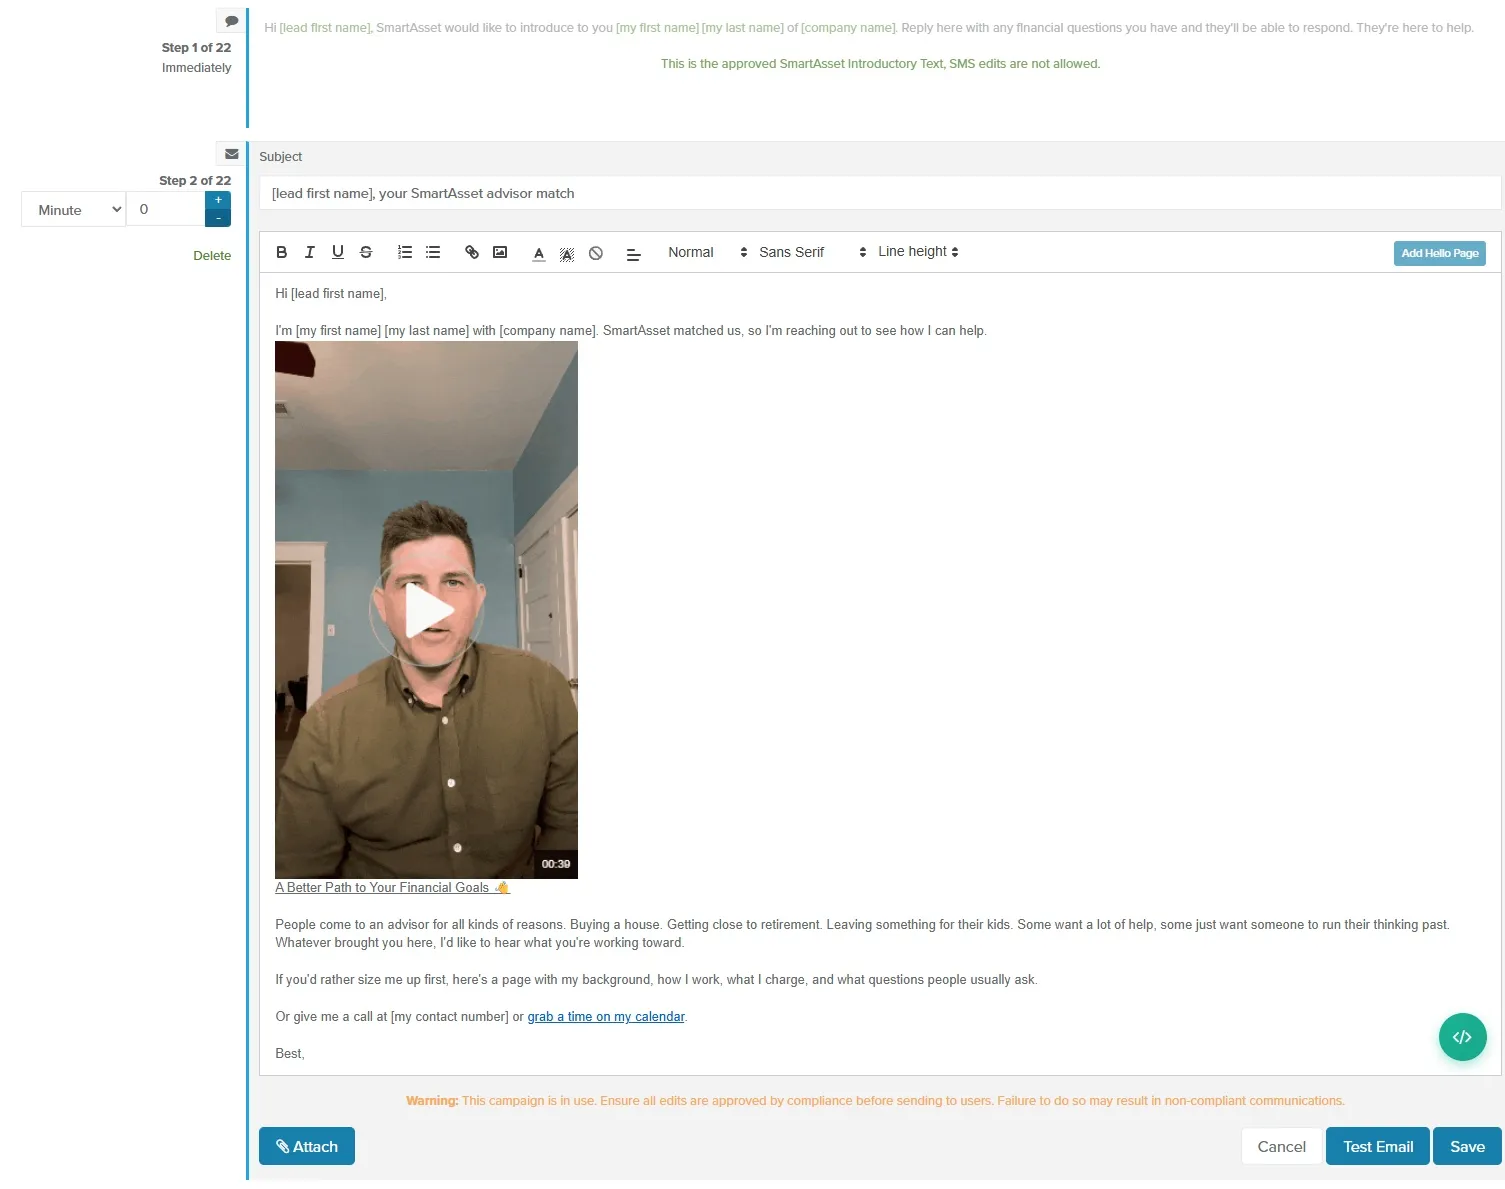
To add any other video, link a thumbnail image or a line of text to the video’s address:
-
Record or upload the video, for example with Loom, Vidyard, or YouTube.
-
Copy the video’s link.
-
In the email step, click the image icon in the toolbar.
-
Choose your thumbnail image.
-
Select the image or the text you want to link.
-
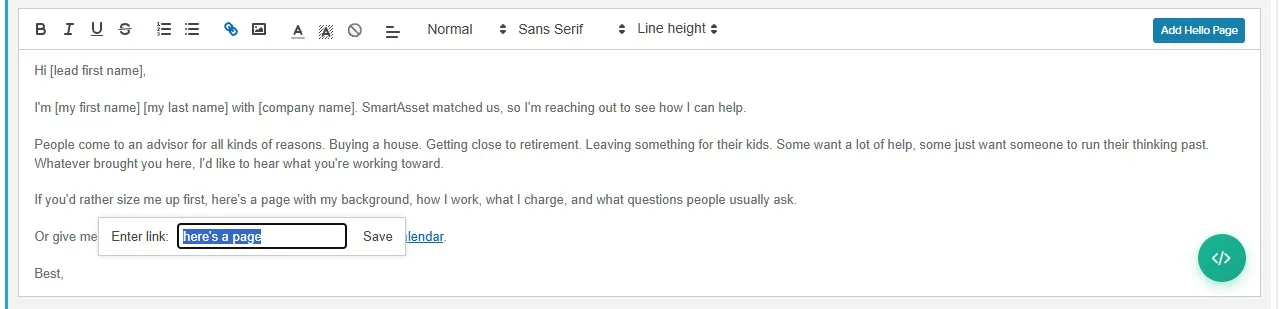
Click the link icon. The Enter link: box opens.
-
Paste the video’s address.
-
Click Save. The image or text now opens the video.
Use Snippets to Personalize Your Messages
Section titled “Use Snippets to Personalize Your Messages”Snippets add the lead’s details, and yours, to a message automatically. If you write “Hi [lead first name]”, a lead named John sees “Hi John”.
- In the email or text step, click where you want the snippet.
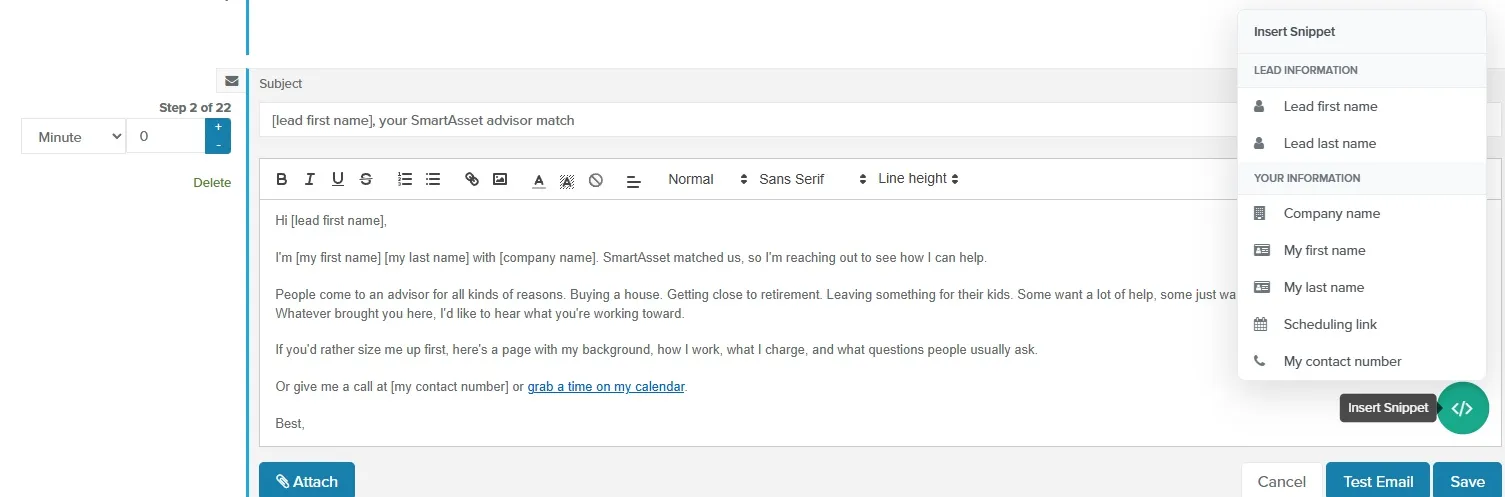
- Click the
</>Insert Snippet button. The Insert Snippet menu opens. - Choose a snippet. Its code, such as
[lead first name], appears in the message.
| Snippet | Fills in | Where it comes from |
|---|---|---|
| Lead first name, Lead last name | The lead’s name | The lead’s details |
| Company name | Your company’s name | Settings > Company |
| My first name, My last name | Your name | Settings > User |
| Scheduling link | Your scheduling link (emails only) | Settings > User |
| My contact number | Your OAT phone number | Settings > Phone Numbers |
If a value isn’t set yet, choosing its snippet opens a window to set it. My contact number appears only when calling is on for your company.
To add or edit your signature, see Import Your Email Signature.
Testing Campaign Emails
Section titled “Testing Campaign Emails”Test your emails before leads receive them, so you see exactly how they’ll look.
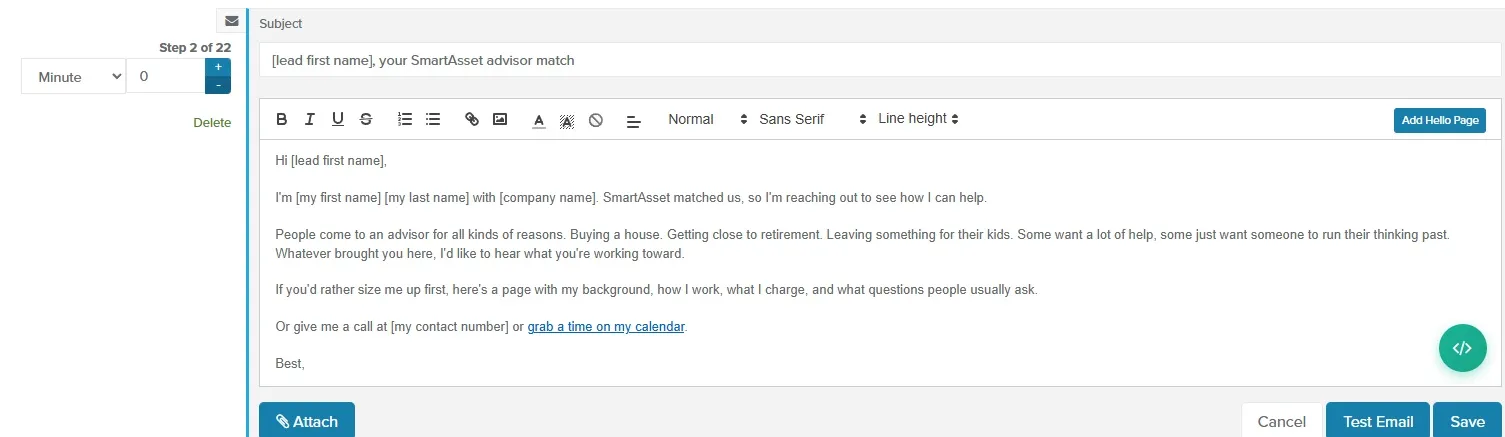
- To test one step, click Test Email while editing it.
- To test every email in the campaign, click Test all emails at the top of the timeline.
Before you put a campaign to use, check whether your firm requires compliance approval. See Understanding Campaign Approval.
Including Opt-Out Options
Section titled “Including Opt-Out Options”The CAN-SPAM Act requires commercial emails to give recipients a clear way to opt out. Include one in every campaign email, in either of two ways:
- Opt-out message: add a line to your email signature inviting recipients to reply if they don’t want more emails. Any reply stops the campaign.
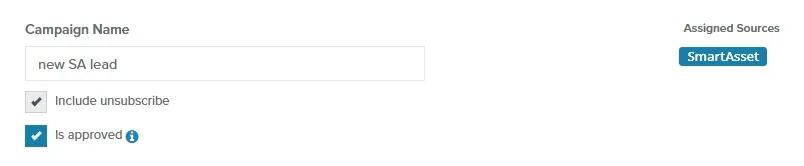
- Unsubscribe link: select Include unsubscribe under the campaign name. OAT adds “No longer wish to receive emails from me? Unsubscribe” to every email it sends from the campaign. A lead who unsubscribes gets no more emails or texts from any campaign.
If your company uses newsletters, Include unsubscribe is on for every campaign and can’t be turned off.
Turning On Your Campaign
Section titled “Turning On Your Campaign”Once your campaign is tested and approved, assign it to a lead source so every new lead from that source gets it automatically.
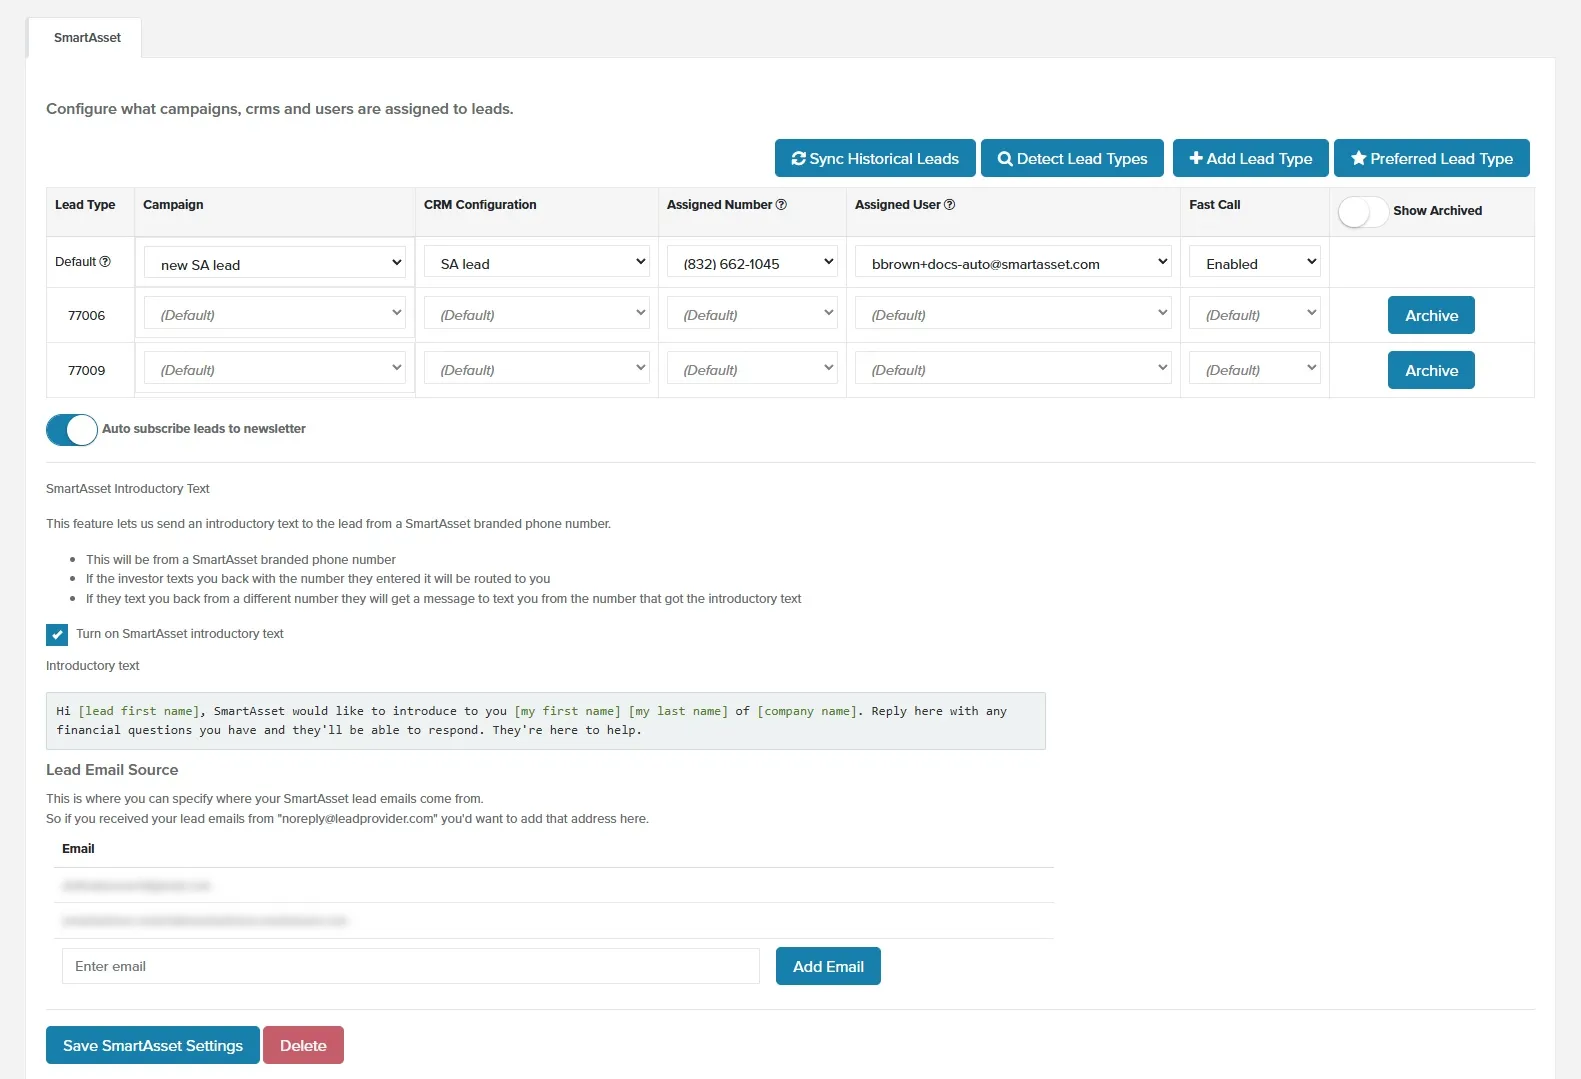
- Go to Lead Sources.
- Find the Default row, or the row for a lead type if you use lead types.
- In the Campaign column, select your campaign.
- Click Save SmartAsset Settings.
From then on, every new lead from that source gets the campaign, and its steps send or appear on your Next Tasks page on schedule.
Assigning a Campaign to a Lead
Section titled “Assigning a Campaign to a Lead”You can also assign a campaign to existing leads, one at a time or in bulk.
- Select the leads on the Leads page, or open one lead’s page.
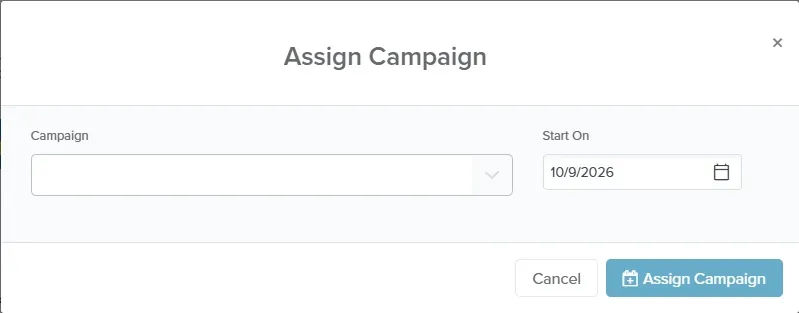
- Click Bulk Edit > Assign Campaign for several leads, or Actions > Assign Campaign for one lead. The Assign Campaign window opens.
- In Campaign, choose the campaign.
- Optional: In Start On, choose a later start date. It’s set to today.
- Click Assign Campaign. The lead’s status changes to Active, and the campaign starts on the date you chose.
Create a Follow-Up Campaign
Section titled “Create a Follow-Up Campaign”Use a follow-up campaign when a lead says “not right now” (out of town, after the holidays, follow up later). It keeps you in touch on their timeline without restarting the original campaign. A quick way to build one is to copy your main campaign and edit the copy.
Build it as pairs of email and call steps, spaced further apart over time:
- Immediately: one email and one call.
- Next: another pair about a week, a couple of weeks, or a month later.
- Longer term: more pairs at 2 and 3 months. After 3 months, add emails only; call steps can’t be scheduled more than 3 months out.
To use it, stop the lead’s current campaign if they’re in one, then assign the follow-up campaign with a Start On date for when they want you to reconnect.
When Does the First Step Run?
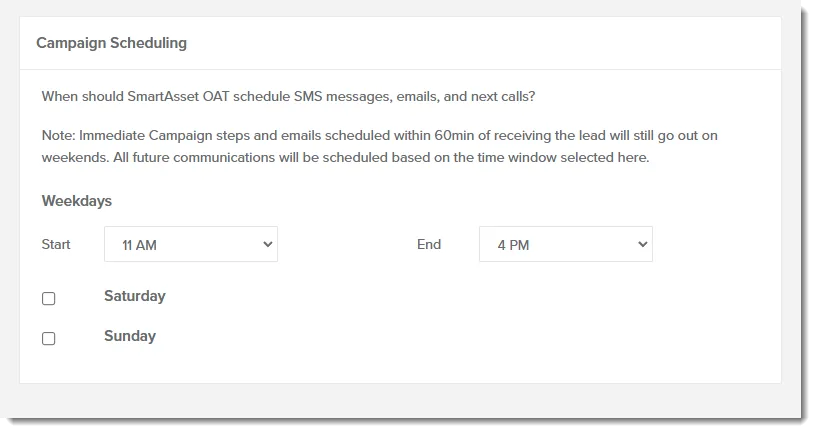
Section titled “When Does the First Step Run?”When the first step runs depends on how the campaign was assigned and on your company’s sending window. OAT applies the sending window in the lead’s local time. If your emails become tasks, the same rules set when each task is due.
To change your sending window, go to Settings > Time and use the Campaign Scheduling section. For details, see Time Settings.
Automated campaign assignment
Section titled “Automated campaign assignment”When a new lead arrives and Lead Sources assigns it a campaign, email and call steps due in the first hour run right away, at any time of day. An immediate text goes out right away only between 8 AM and 9 PM in the lead’s local time, or narrower hours in some states. Otherwise it waits for your next sending window. Later steps follow your sending window.
Manual campaign assignment (single lead, bulk assign, or import)
Section titled “Manual campaign assignment (single lead, bulk assign, or import)”Manual assignment means using Assign Campaign for one lead or through Bulk Edit, or choosing a campaign while importing leads. The first step follows your sending window:
- Inside the window: about 5 minutes after you assign the campaign.
- Before the window opens: at the start of that day’s window.
- After the window closes: at the start of the next sending day’s window.
If you choose a later Start On date, the first step runs at the start of that day’s window. Imported leads are spread out over time, up to 30 leads per day.
Example: your sending window is 9 AM to 5 PM, and the lead is in your time zone. If you assign the campaign at 10 AM, the first email goes out at about 10:05 AM. If you assign it at 6 PM, it goes out shortly after 9 AM on the next sending day.
Stop a Lead’s Campaign
Section titled “Stop a Lead’s Campaign”A lead’s campaign stops on its own, and their status changes to Responded, when they:
- reply to a campaign email or text
- call you
- book a meeting through your connected calendar tool (see What Happens When a Lead Books)
Campaigns don’t stop after an outgoing call, because OAT can’t tell how the call went. If no more outreach is needed, stop the campaign yourself, or click Mark Responded on the lead’s page. Stopping a campaign removes its remaining campaign tasks from Next Tasks; tasks you added yourself stay.
From the Leads Page
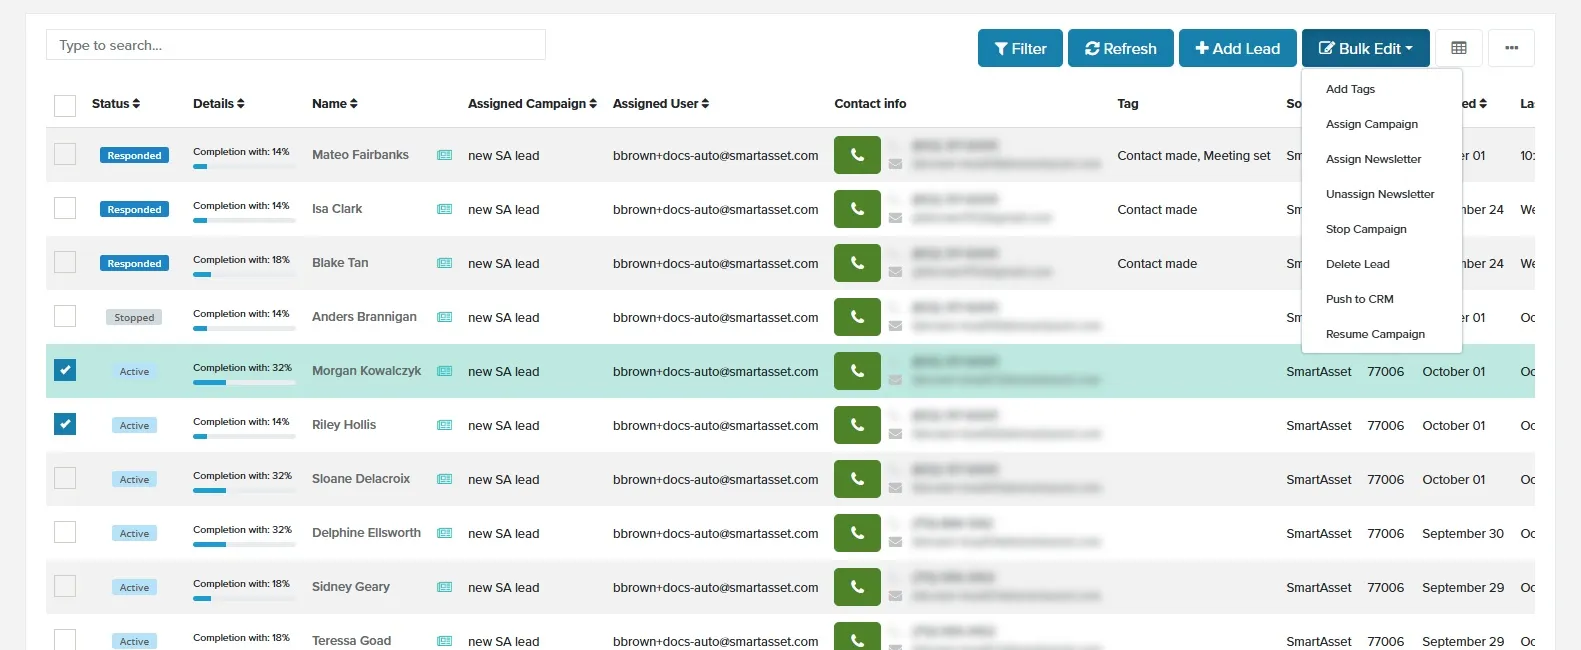
Section titled “From the Leads Page”- On the Leads page, select the leads whose campaigns you want to stop.
- Click Bulk Edit > Stop Campaign.
- Click Yes. The campaigns stop, and their remaining campaign tasks are cleared.
From a Lead’s Details Page
Section titled “From a Lead’s Details Page”- On the Leads page, click the lead’s name. Their details page opens.
- Click Actions > Stop Campaign.
- Click Yes. The lead’s status changes to Stopped.

What Happens When a Lead Unsubscribes?
Section titled “What Happens When a Lead Unsubscribes?”When a lead clicks the unsubscribe link in a campaign email:
- Their campaign stops, and their status changes to Unsubscribed.
- Campaigns send them no more emails or texts. You can still assign or resume a campaign, but only its call steps run. The Assign Campaign window warns you about this.
- You can still call or text them yourself until they opt out of texts. After a lead opts out, OAT blocks all calls and texts to them. See Opt-Outs.
The unsubscribe link appears only in emails OAT sends for you, and only when the campaign has Include unsubscribe selected. If you send your emails yourself, include an opt-out message in the body instead (see Including Opt-Out Options). To unsubscribe a lead yourself, see Unsubscribing a Lead.
Related Guides
Section titled “Related Guides”- Next Tasks: working the call, email, and text tasks your campaigns create
- Understanding Campaign Approval: tracking compliance review
- Lead Sources: assigning campaigns to new leads automatically
- Hello Pages: adding a personal video page to your campaign emails
- Time Settings: setting your campaign sending window